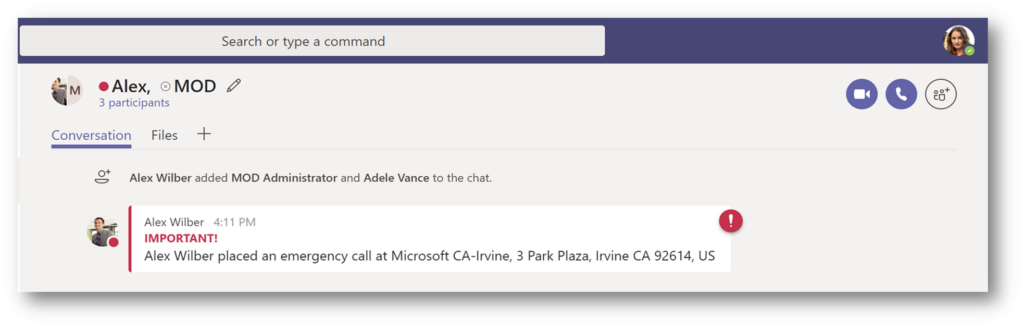
Jekyll2026-10-04T19:18:50+00:00https://www.watts365.com/feed.xmlWatts365Microsoft Teams, Teams Phone and M365 notes from Rob WattsExtending emergency call notifications with the Power Platform2024-06-27T14:00:00+00:002024-06-27T14:00:00+00:00https://www.watts365.com/2024/06/extending-emergency-call-notifications-with-the-power-platformDo you want e-mail notifications when someone places an emergency call in Microsoft Teams? Do you want to dynamically send these e-mails automatically dependant on which office the user makes the emergency call from?
I have just finished presenting at Commsverse 2024, where I launched an open source solution that you need to see!
Built on the Power Platform, this solution takes the default group chat notification and allows you to add e-mail to the mix… But! It’s not limited to e-mail. If Power Automate has a connector for it, you can use it! SMS via Azure Communication Services is another example of where these notifications can be extended further.
[List of all Power Automate connectors
Microsoft Learn](https://learn.microsoft.com/en-us/connectors/connector-reference/connector-reference-powerautomate-connectors)
Emergency call notifications in Teams are a feature that allows administrators and users to receive alerts when someone in their organisation makes an emergency call using Teams Phone System.
The notifications can help responders locate and assist the caller quickly and efficiently. Currently, this is limited to notifying a group of people in a group chat.
Maybe you want to notify a security desk, who don’t have Teams or send an SMS to a Health and Safety Manager to keep them informed.
All you need to get started are:
A Service Account with the an appropriate license for:
Power Automate
Microsoft Teams
Microsoft Exchange
SharePoint
A SharePoint list
Teams Telephony Administrator, Teams Communication Administrator or Teams Administrator role.
It’s something that many Microsoft customers have asked for on their journey to Microsoft Teams Phone, and now it can be a reality.
]]>Microsoft Places - Public Preview… Get started today!2024-05-13T00:12:29+00:002024-05-13T00:12:29+00:00https://www.watts365.com/2024/05/microsoft-places-public-preview-get-started-today🔥🔥🔥 Hot off the press!!! 🔥🔥🔥On Friday, Microsoft released a deployment guide for Microsoft Places. They also shared information about the Microsoft Places Public Preview Program, which you can opt in to now!
This is something I’ve been waiting for, since the day Places was first announced.
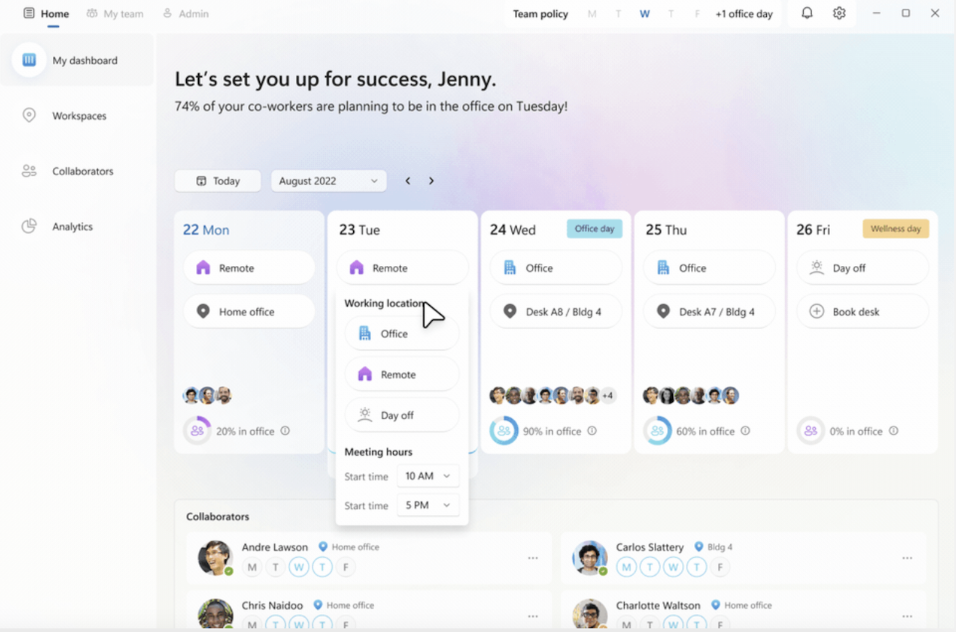
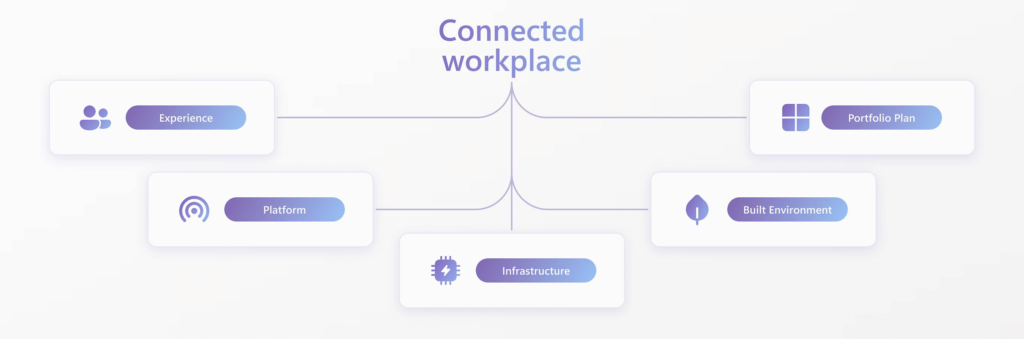
But what is Microsoft Places? Places is a new connected workplace app that reimagines flexible work
Places brings new life to flexible work by successfully unlocking closer connections between teams and colleagues, elevating an improved workplace experience, and driving confident decision-making related to space optimization.
Reimagine where and how you work
Keeping pace with all the ways the workplace has evolved in recent years means rethinking and strengthening how people connect in physical and digital spaces. Foster a truly connected workplace with Microsoft Places - a modern solution for today’s needs with the flexibility to adapt to tomorrow’s needs.
https://www.youtube.com/watch?v=ndrS8B89uO4
Pre-requisites for Microsoft Places
Licensing
Places requires one of the following subscriptions:
Microsoft 365 Business Standard
Microsoft 365 Business Premium
Microsoft 365 E3
Microsoft 365 E5
Microsoft 365 A3
Microsoft 365 A5
Microsoft 365 E3, E5, A3, or A5 Extra Features, when combined with a corresponding Office 365 or Microsoft 365 plan.
Step 1 - Confirm Exchange permissions
Microsoft Places relies on Exchange mailboxes as the foundational infrastructure for coordinating schedules and booking resources such as rooms or workspaces. IT Admins must be assigned the Exchange administrator role to manage Exchange-related configurations for Microsoft Places.
Places cmdlets that manage your tenant settings or other places like Building and Floor require the TenantPlacesManagement role.
Use the following cmdlet to evaluate what roles are currently assigned:
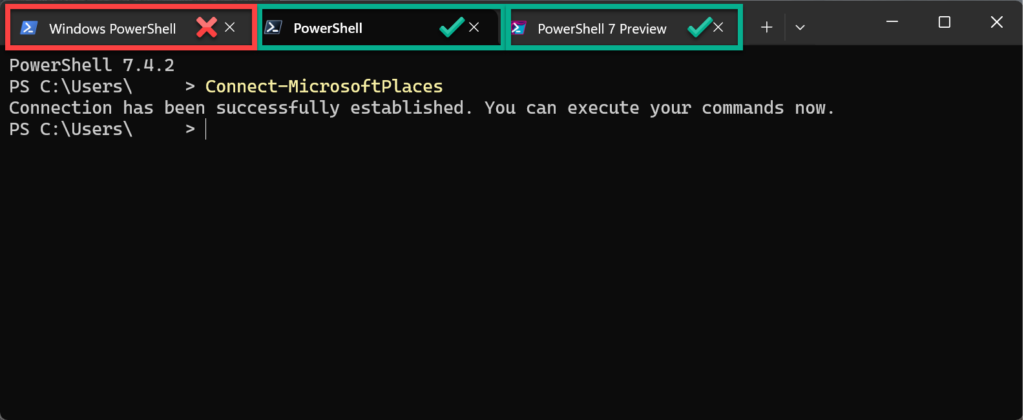
To configure capabilities and enable users with Microsoft Places, ensure the latest version of PowerShell is installed to PowerShell 7. Follow these steps to update your PowerShell:
Run the following command in PowerShell:
winget search Microsoft.PowerShell
Run the following command to install PowerShell or PowerShell Preview using the ID parameter:
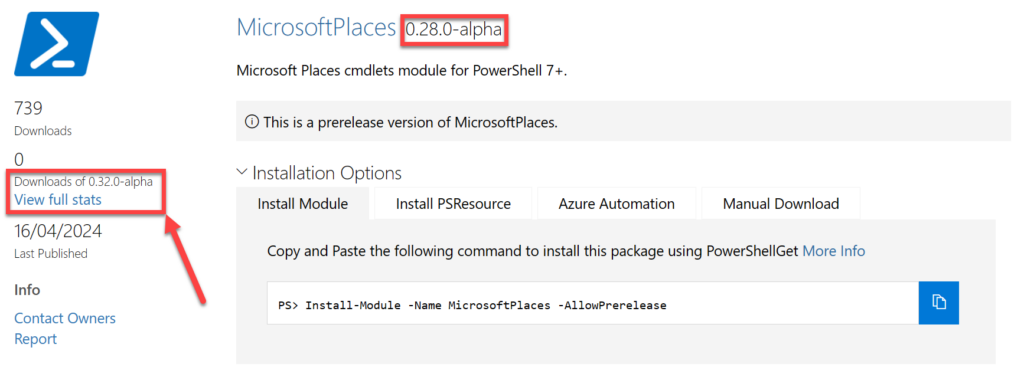
Note:At the time of writing this blog post, the latest pre-release on PowerShellGallery.com was 0.28.0-alpha (This version does not have all of the parameters needed to deploy Places. Check the latest release on PowerShell Gallery before running the PowerShell command. Confirmed working 0.32.0-alpha
Run PowerShell (v7).
Install the latest Places PowerShell client using the following cmdlet:
If you got this far… you’ve completed the pre-requisites. 👍 Now it’s time to deploy Places… I’m excited.
Deploy Microsoft Places
These steps will provide Places to your users and enable Workplans. This will help facilitate hybrid work coordination, employees can communicate their work location (e.g. ‘in-office’ or ‘remote’) for specific days of the week via Workplans.
These cmdlets are available to tenants to enable or onboard to Places Public Preview. By default, the Calendar features will be available to users. The following cmdlets are used by the tenant admins to enable buildings, apps, and location sharing controls.
As the Exchange administrator, you can enable Places for all members of your tenant or to a select subset via mail-enabled security group.
Enable Places for all users in your tenant
In the latest version of PowerShell (v7) , run the following cmdlet to connect to Places:
Connect-MicrosoftPlaces
Enable Places Web app and Places Mobile app for all users
To enable Places Web app and Places Mobile app for all users, run the following cmdlet in PowerShell:
Places can be enabled for specific employees within your company by utilising a mail-enabled security group. You must add or remove users through the mail-enabled security group created - in most cases this should be immediate, but for users and groups new to the tenant (or have not been active), this could take up to 1 day.
Connect to the Microsoft Places service in PowerShell by running the following command:
Connect-MicrosoftPlaces
Run the following command to enable Places for a mail-enabled security group, which includes all users requiring access to Places and users in the analytics group:
Set-PlacesSettings -Collection Places -EnablePlacesWeb ‘Default:false,OID:<Mail enabled Security Group ObjectID>@<TenantID>:true’

Set-PlacesSettings -Collection Places -EnablePlacesMobileApp ‘Default:false,OID:<Mail enabled Security Group ObjectID>@<TenantID>:true’
Verify who has access to Places
You can verify the above commands worked by running the following command:
Note:It may take up to 1 day for users to gain access
You’ve deployed Microsoft Places, and will have access to the following features of Microsoft Places.
Location Plans: Allow employees to share their proposed location schedule and see who else is attending in-person.
In-Person Meetings: Easily communicate your intention to work together with an in-person meeting invite.
Hybrid RSVP: Meeting participants can share whether they attend in person or remote.
Peek Cards: Easily see who’s coming into the office and adjust your location plan, directly from your Outlook Calendar. Receive notifications to book space on days in office.
Expanded Presence: Add location to your presence signal to indicate when you’re in the office or a particular office.
Places is available as a Teams app within Teams and Outlook
Places iOS app
The iOS app is an opt-in feature.
Want more from Microsoft Places?
You can opt-in to the Microsoft Places Public Preview Program via this form.
Before opting in, you’ll need to review and confirm you meet the following pre-requisites:
You are a Microsoft 365 administrator for the commercial tenant you wish to enroll.
Your organisation must be a commercial or education organisation under an existing enterprise agreement with Microsoft.
You have at least one of the required prerequisite plans for Places enabled on your tenant:
Microsoft 365 Business Standard or Business Premium
Microsoft 365 E1, E3, or E5
Microsoft 365 A3 or A5
The following features are available for early access as part of the public preview program. Microsoft will release these features in waves as they ramp up capacity to meet demand:
Places Finder: Book desks or rooms with the value of additional data: images of the space, floorplans, information about technology available.
Intelligent Booking: Receive recommended rooms or desk pools and with one select, book suggested space or browse other suggestions.
Places Explorer: Get a singular view of the people, spaces, and experiences at each workplace location.
Analytics features: Get access to intent and actual occupancy and utilization data.
Auto-release policies: Allow reserved rooms to be automatically released if unoccupied.
FAQs for the program can be found here - [Opt in to the Microsoft Places Public Preview Program - Deploy Office
Microsoft Learn](https://learn.microsoft.com/en-us/deployoffice/places/opt-in-places-preview#faq)
The official deployment guide can be found here - [Deployment guide for Places - Deploy Office
Microsoft Learn](https://learn.microsoft.com/en-us/deployoffice/places/deployment-guide-for-places) and [Opt in to the Microsoft Places Public Preview Program - Deploy Office
Microsoft Learn](https://learn.microsoft.com/en-us/deployoffice/places/opt-in-places-preview)
]]>I’m speaking at Commsverse 2024!2024-03-11T17:00:00+00:002024-03-11T17:00:00+00:00https://www.watts365.com/2024/03/im-speaking-at-commsverse-2024What is Commsverse?
Commsverse, is not your average conference. Being niche and small means that we can and do go above and beyond to ensure all your needs are taken care of. Commsverse is an experience for everyone and a place that Microsoft Teams enthusiasts can network with the entire community.
At Commsverse, you will learn from the best in the industry and will gain knowledge and understanding far beyond anything else on offer in the market.
What am I speaking about?
In my session, Extending emergency call notifications with the Power Platform and ACS, join me, as I walk you through how you could leverage the Power Platform to extend the notifications beyond a Teams group chat… Perhaps an e-mail or even via SMS by using Azure Communications Services.
Emergency call notifications in Teams are a feature that allows administrators and users to receive alerts when someone in their organization makes an emergency call using Teams Phone System. The notifications can help responders locate and assist the caller quickly and efficiently. Currently, this is limited to notifying a group of people in a group chat.
But! Why limit this to only a notification in Teams… What if you want to include more information about where the user is, or how to contact them? What if you want different people to be notified depending on which office they are in.
Add my to session to your Agenda
Buy Tickets for Commsverse 2024
]]>Neat Pulse: The heartbeat of your meeting rooms2024-01-23T08:32:53+00:002024-01-23T08:32:53+00:00https://www.watts365.com/2024/01/neat-pulse-the-heartbeat-of-your-meeting-roomsNeat Pulse is your one-stop-shop for bosses of the IT world to keep tabs on their Neat gadgets. It's a babysitter that doesn't need a background check—dashboards for days, remote control antics, and setup so easy your grandma could do it post-bingo. Truly, Neat Pulse is the Mary Poppins of device management, practically perfect in every way. And if you're mourning your complex relationships with old-school databases, trust me, you need Neat Pulse's simplicity like yesterday's leftovers need the microwave!
Neat Pulse is designed to give complete peace of mind when it comes to deploying and maintaining Neat devices. Providing IT administrators with access to a powerful management platform (Pulse Control), premium technical support (Pulse Care) and extended warranty (Pulse Cover).
With Neat's new support offering changing on 1st February, I thought I'd give an overview of how Neat Pulse can give you a single pane dashboard to manage all of your Neat devices. Read more about Neat's changes here.
Let's take a look at what Neat Pulse has to offer.
Dashboard
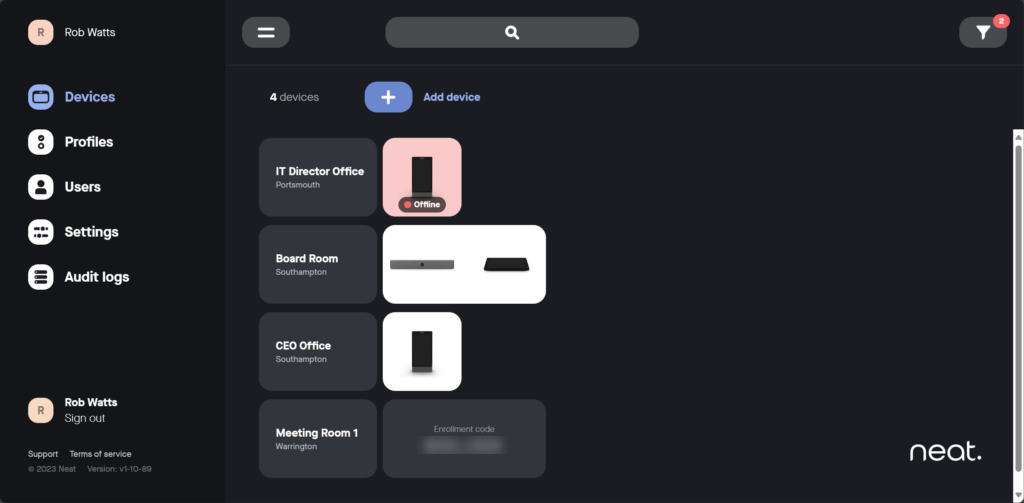
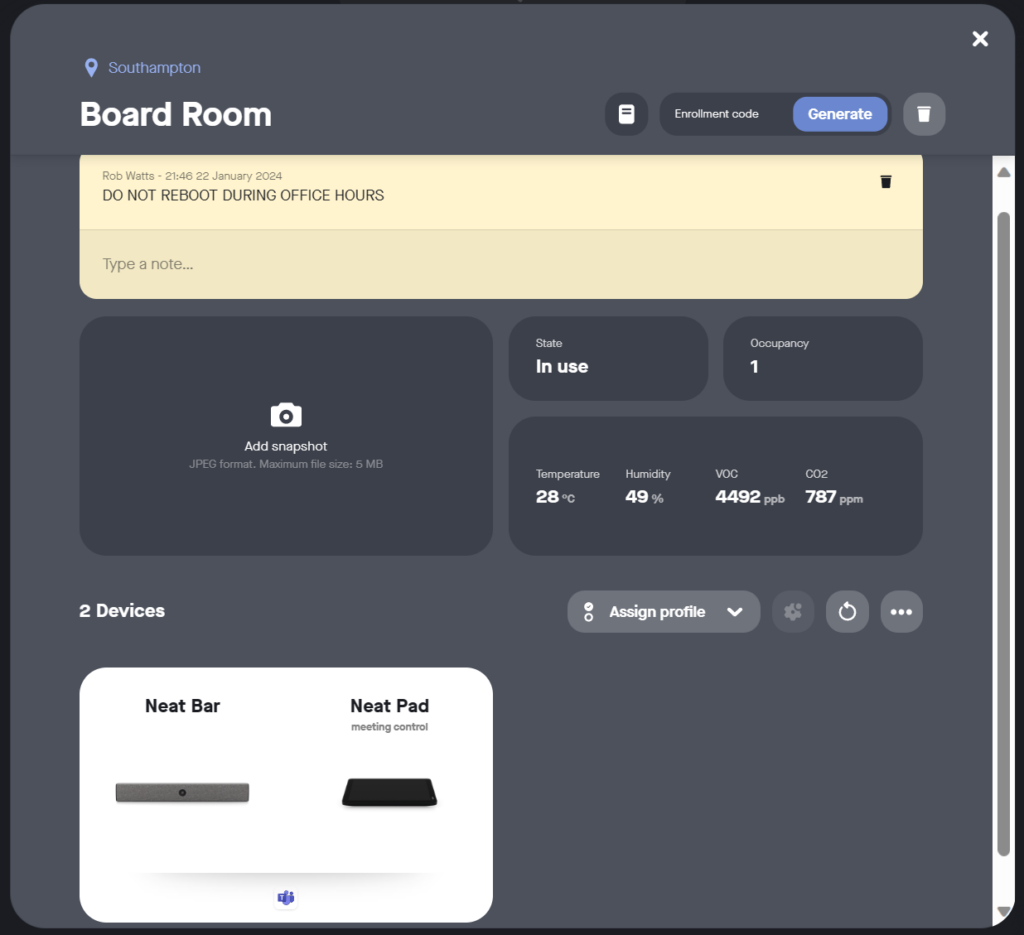
Starting with the Neat Pulse dashboard, which is in keeping with Neat's "keep it simple" approach. From here you are able to see the status of our Neat devices. If needed, we are able to filter based on status, region, location, device or profile.
Add a device
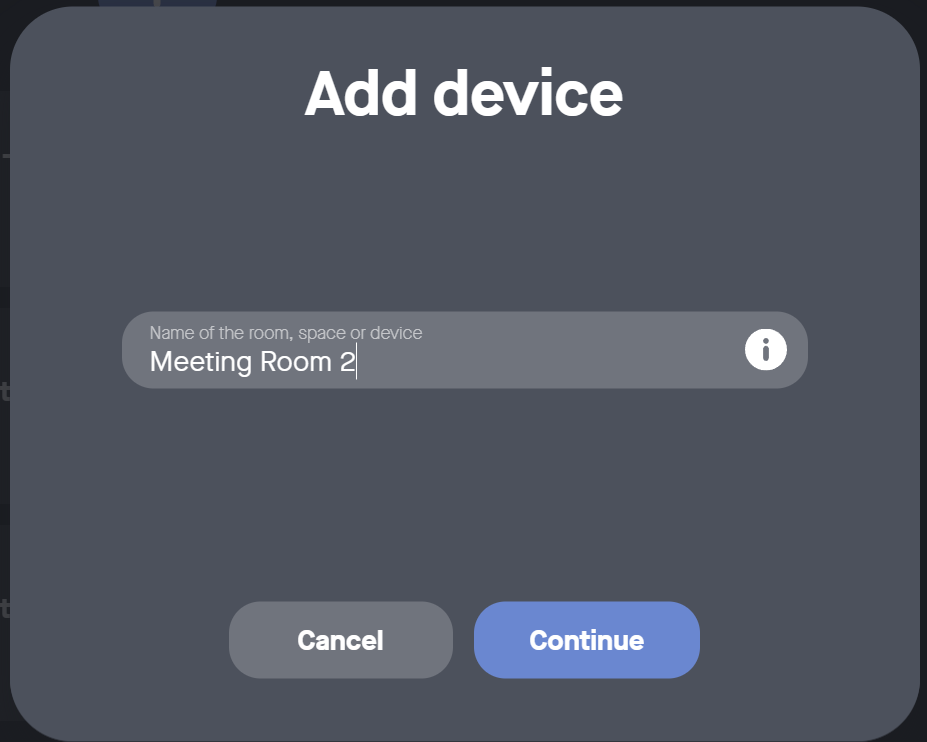
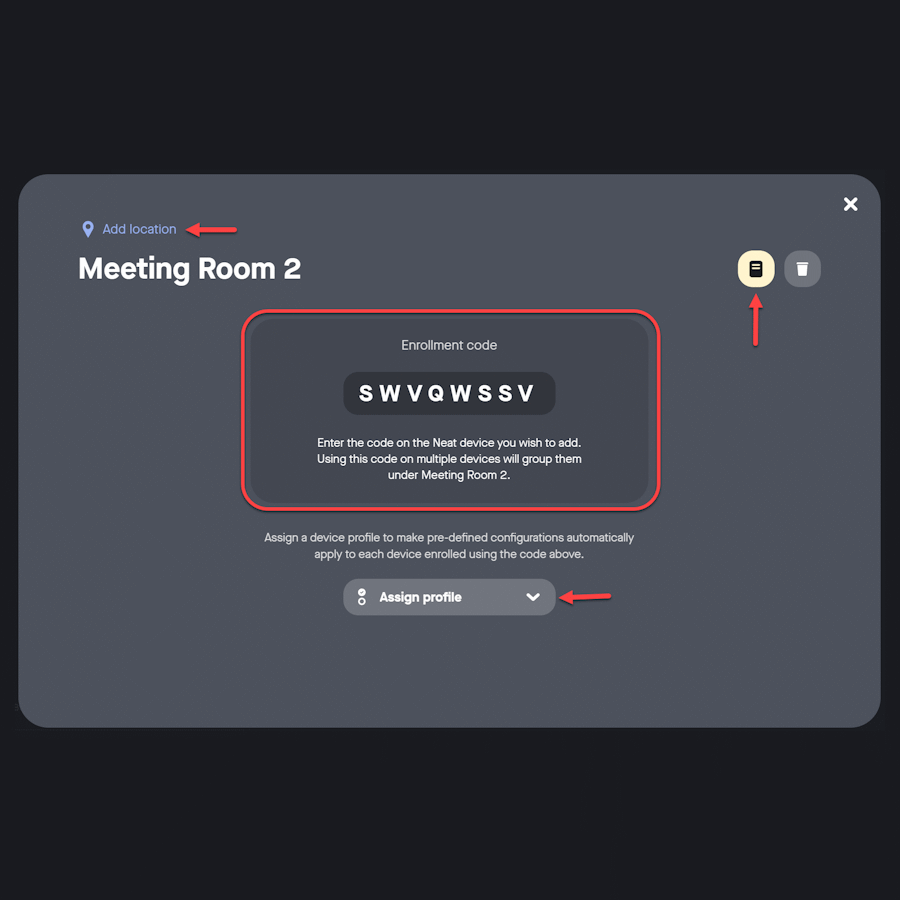
From here you're able to add a device to Neat Pulse, the process is truly effortless. Simply add a name for the room, space or device. Once you press continue, you'll see an enrolment code, which you use to link your Neat devices. From this screen you can also set the location of the device, assign a profile and even add notes.
Viewing device details
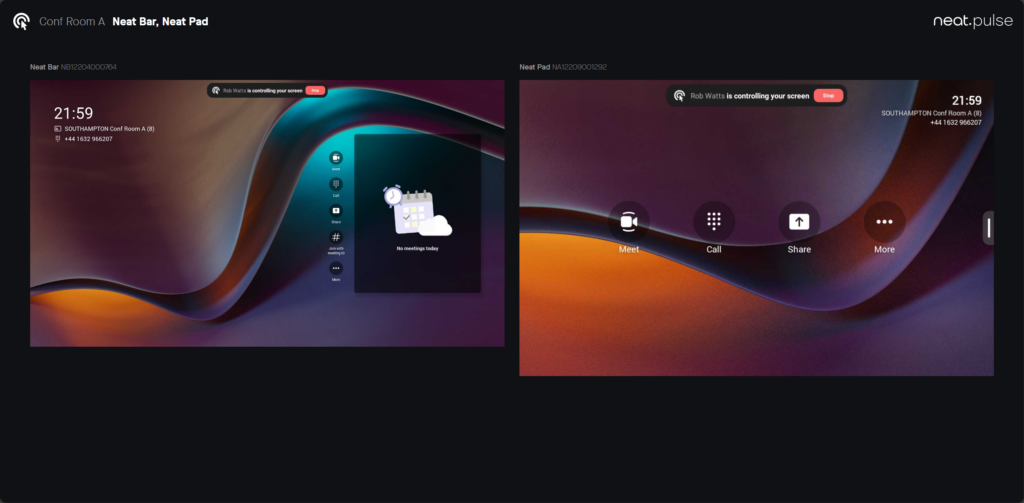
By clicking on a device group, you're able to see more details about that group, including any notes added to Neat Pulse by another administrator, the device's current state. You can even gain insights about environmental factors from the room or space the device is in. You can also assign a profile or restart the device from this screen.
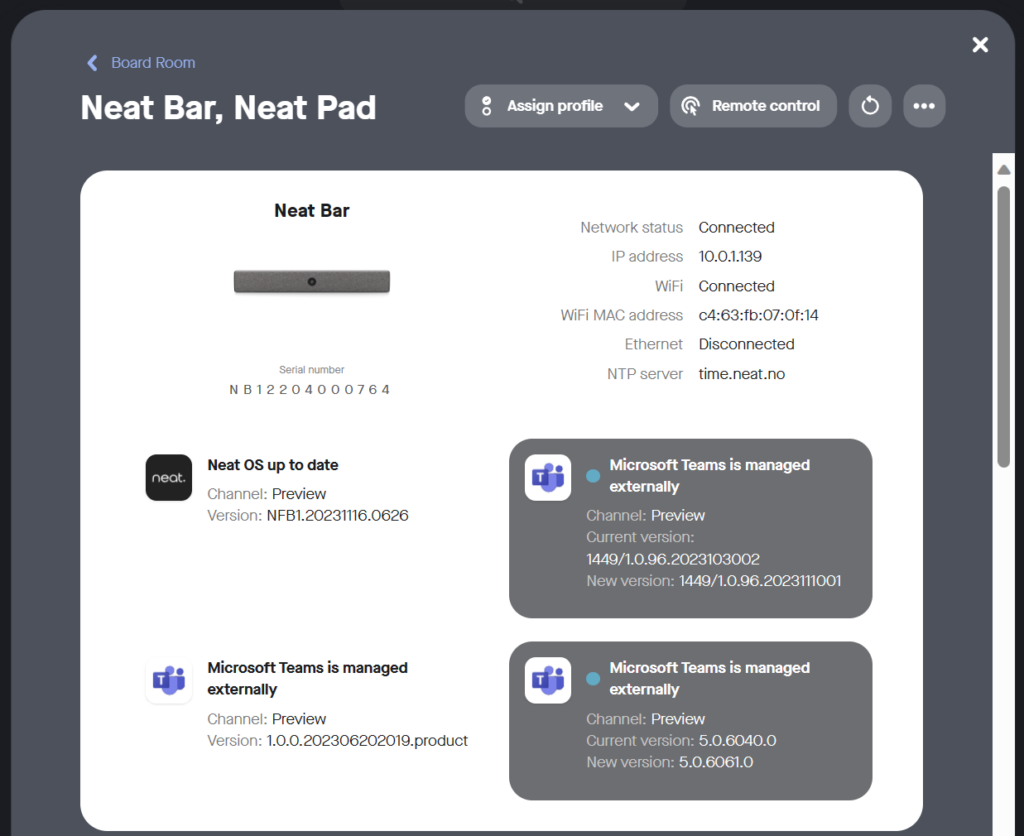
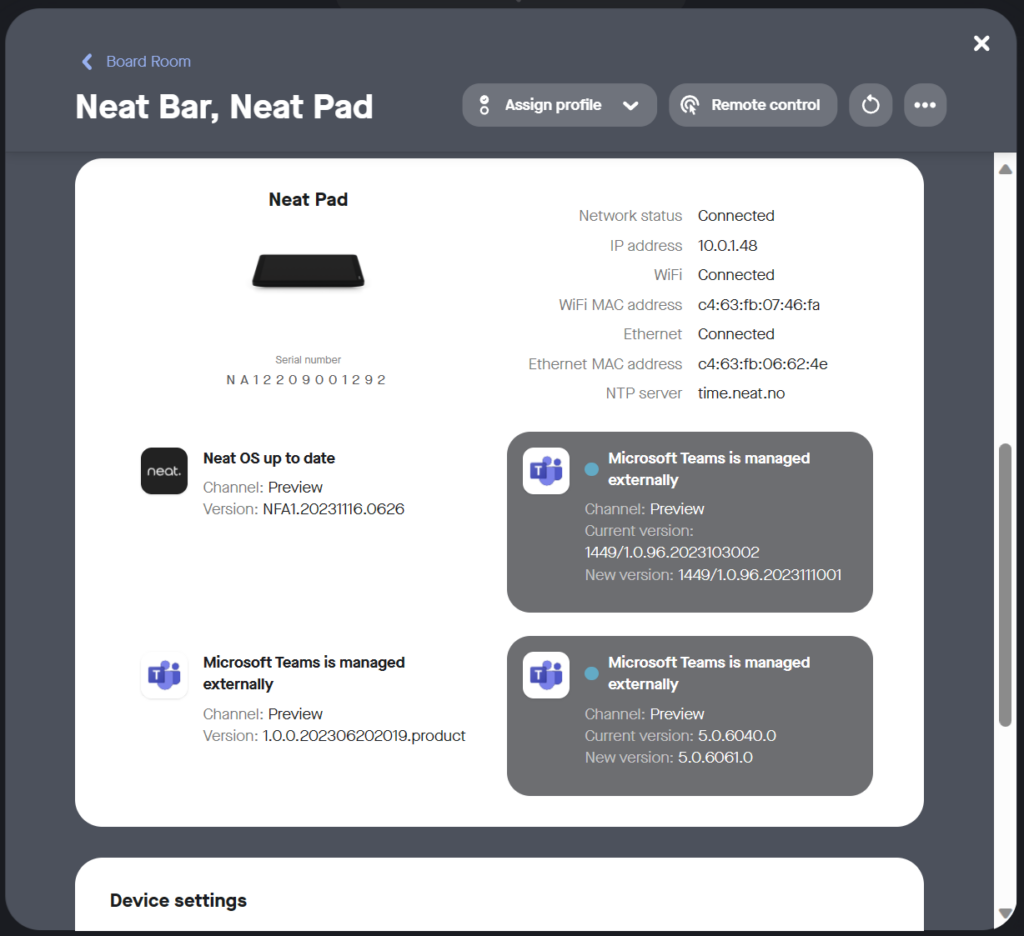
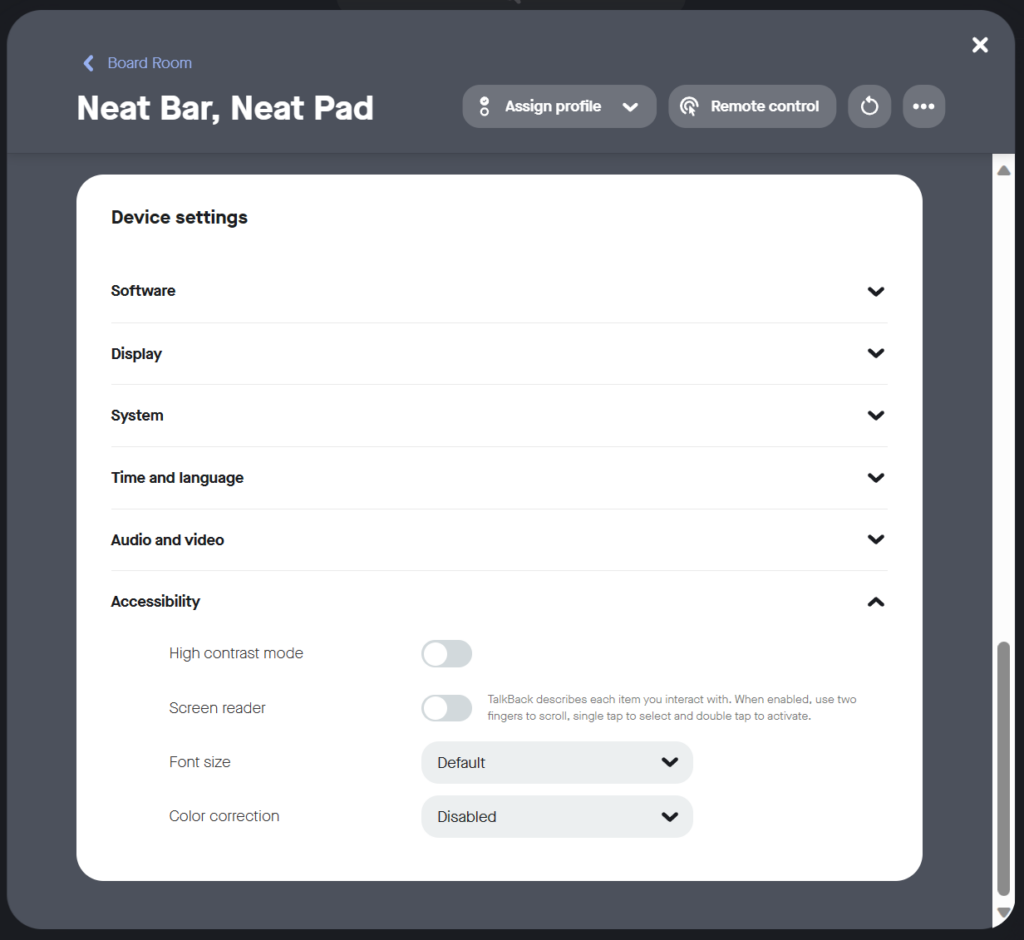
Drilling through to the devices area, not only are you able to see further details about the device, you can change settings too. View details like the serial number, software versions to the device's network configuration. You can even change settings relating to the device's software, display, audio and video and accessibility to name a few.
Remote Control
But wait! There's more and this is when the fun starts. You can remotely control the device, directly from Neat Pulse, with or without someone being locally in the room (Occupants are given 15 seconds to approve via a prompt on the screen and panel before the connection is automatically approved.
Here you'll gain full remote control access to all paired devices. Whether it's to troubleshoot an issue, or even provide remote white-glove service for an Executive, Neat pulse enables you to do this from the wherever you are in the world. It's truly amazing what Neat Pulse can do.
Profiles
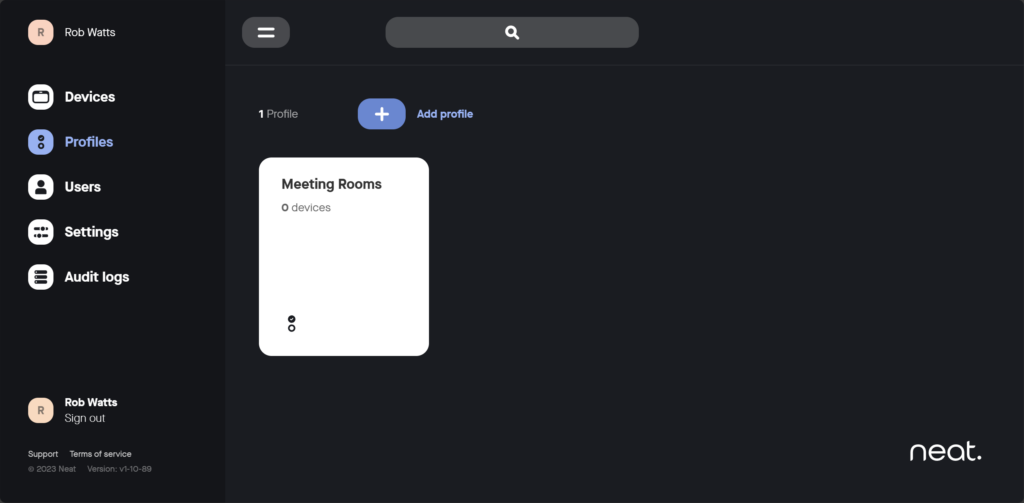
By selecting Profiles from the left menu, you are able to view, create and modify any device profile in use across the platform.
Settings
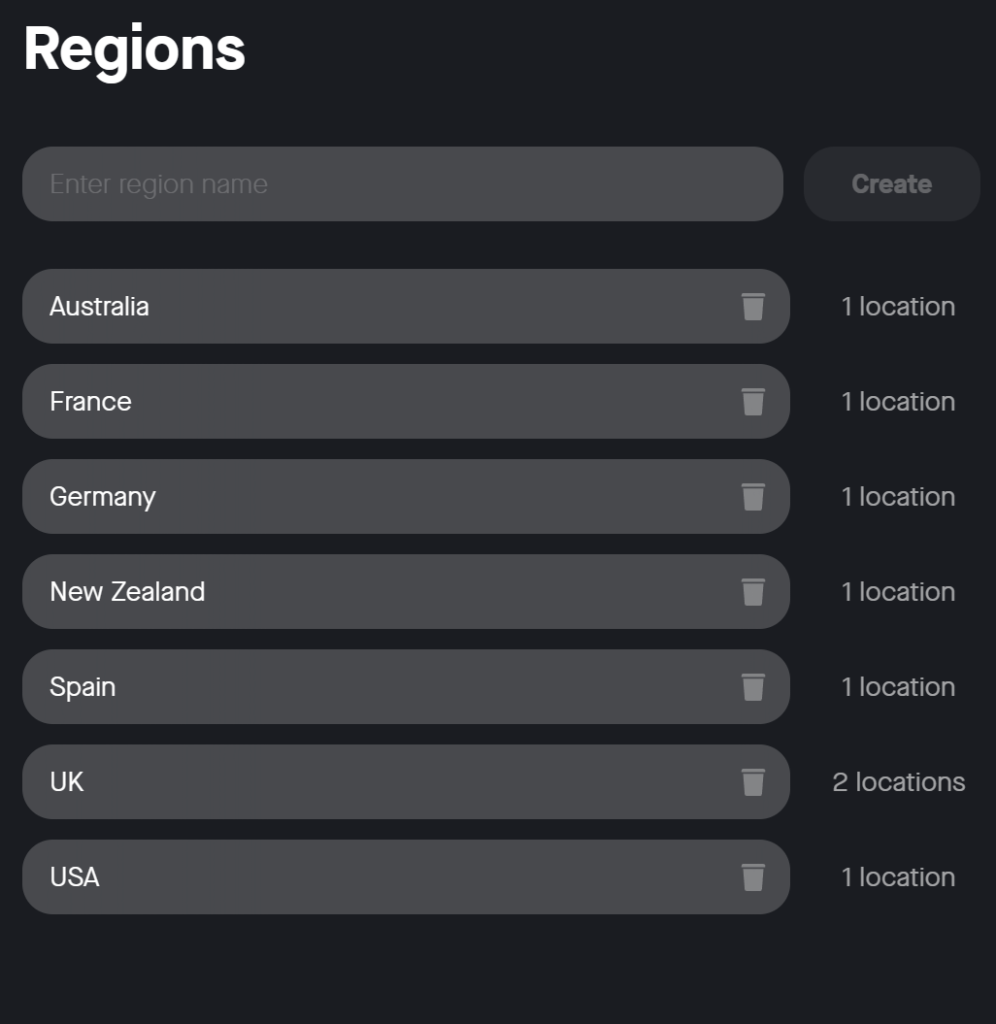
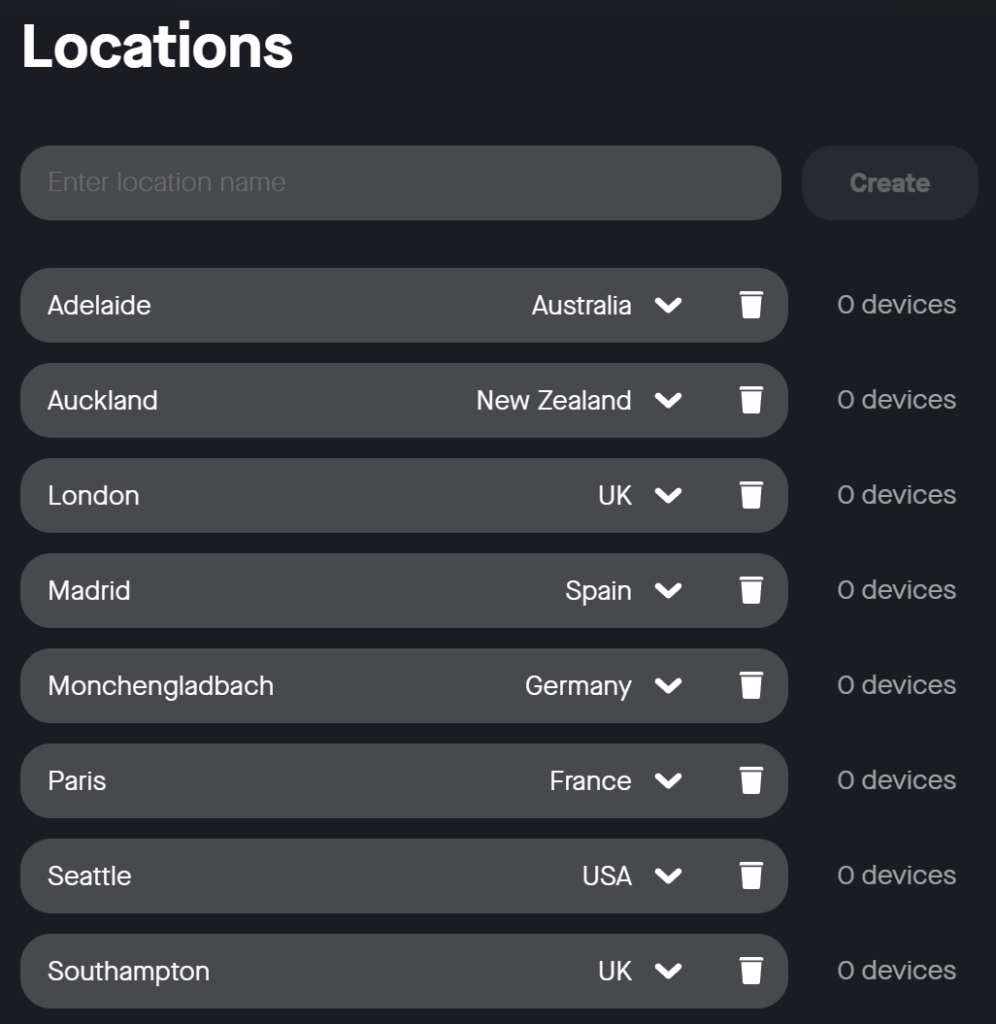
Navigating to the Settings menu, Neat's simplicity continues. This bit is important. Neat Pulse uses three simple relationships. Here's the first two...
Regions are linked to Locations. Locations are assigned to Devices. Make sense so far? Much easier than relationships in access databases. Right? Those were the days... ABSOLUTELY NOT!
Users
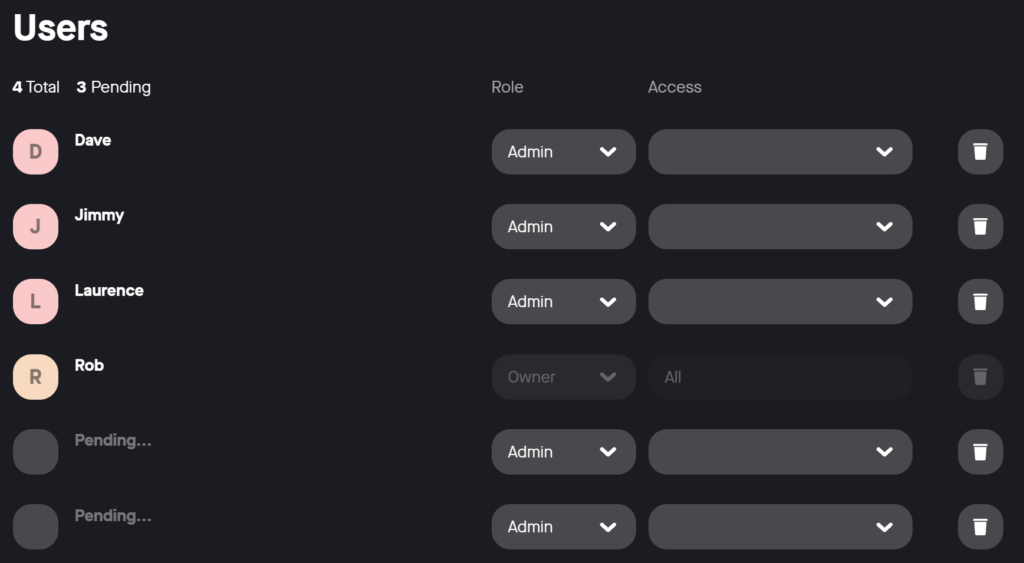
The final piece of the puzzle! Users... Again following Neat's simple but effective approach, inviting new users takes seconds. Simply type in the user's email address, select from one of two roles (Admin or Owner). If the user is an Admin, you can select the Regions which that user has access to manage. Owners have access to all regions and click Invite. Easy peasy! And...we have our final relationship. Users are assigned to Regions.
The newly invited user will receive an email inviting them to join Neat Pulse. You'll be able to sign into Neat Pulse using your work email and password, or by linking to your Microsoft Entra credentials (or Google's equivalent)
Owners will be able to see manage users from this page too. Change their roles, assign their access, which is linked to Regions, remember? Owners can even also see who hasn't accepted their pending invite... Which does make you wonder...Why wouldn't you accept an invite to Neat Pulse?
Audit logs
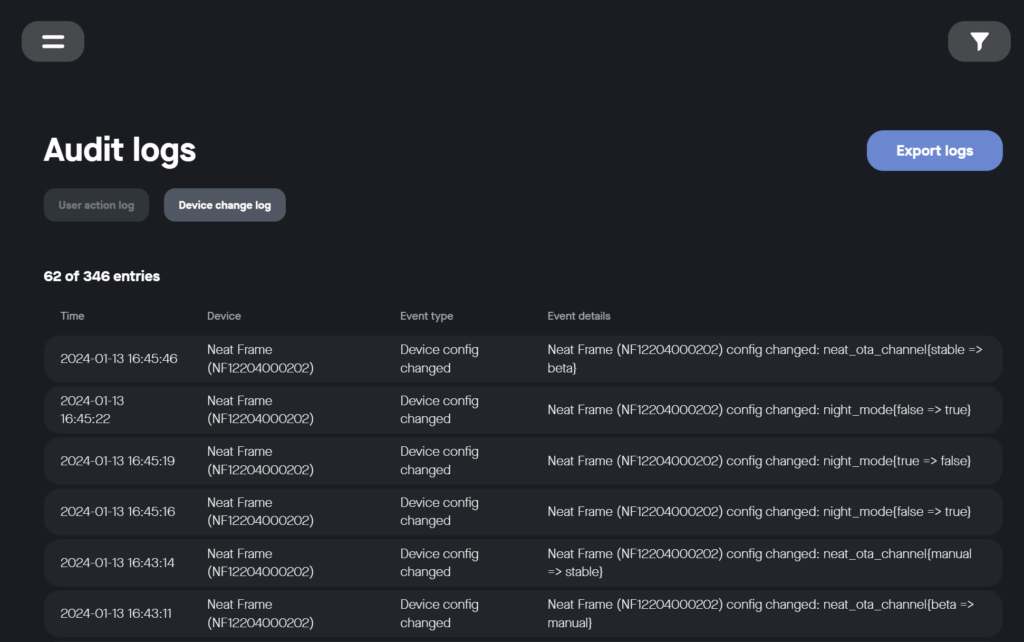
If you've made it this far, congratulations! Audit logs aren't fun. But at least Neat make them easy! You can choose between user action logs and device change logs. You can even export the logs, if Neat's super simple interface isn't enough for you (or you have a lot of logs, of course!). Don't forget, you can filter them too!
In Summary
Neat Pulse is a really simple management platform, but that doesn't mean it's not effective! It's amazing how much power something so simple really has. My quick blog post, doesn't do it justice. If you have Neat devices, Neat Pulse is the tool for you. Unlike the Kaiser Chiefs once sang, today you learned something! Now go on, never miss a beat with Neat Pulse.
]]>AI Generated Alt Text! Automagically?2023-09-08T23:05:25+00:002023-09-08T23:05:25+00:00https://www.watts365.com/2023/09/ai-generated-alt-text-automagicallyDo you use WordPress? Are you looking for a quick way to make your site more accessible? Because here’s how to use Azure AI Vision to create automatic AI generated Alt Text for media within your site.
Let’s dive in…
Pre-requisites for Automatic AI Generated Alt Text
Firstly, the plugin only works with newly uploaded images.
Another thing the plugin will not add alt text to your existing images.
Finally, the plugin only adds at text in English.
But, not bad for a FREE plugin, right?
Once you’ve done this, you can enable it straight away.
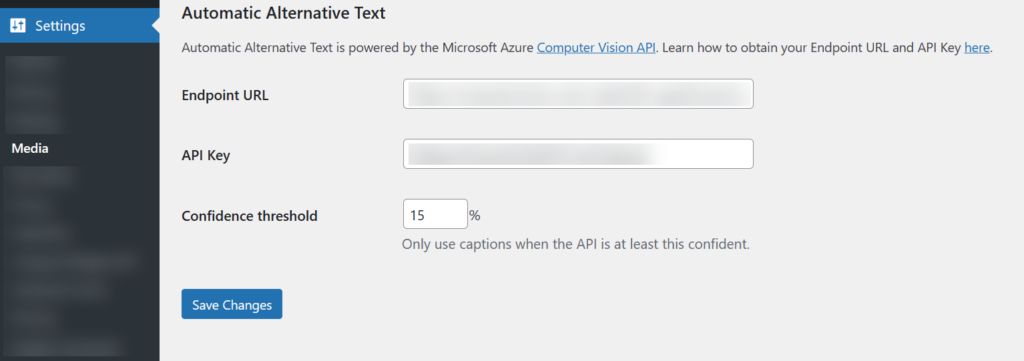
Then, if you navigate to Settings, then Media. You’ll see a new section of the page called Automatic Alternative Text.
Wait! We need an Endpoint URL and API key? On to the next step.
Let me introduce you to Azure AI Vision. Albeit, with Alt Text generation, we’re only scratching the surface here.
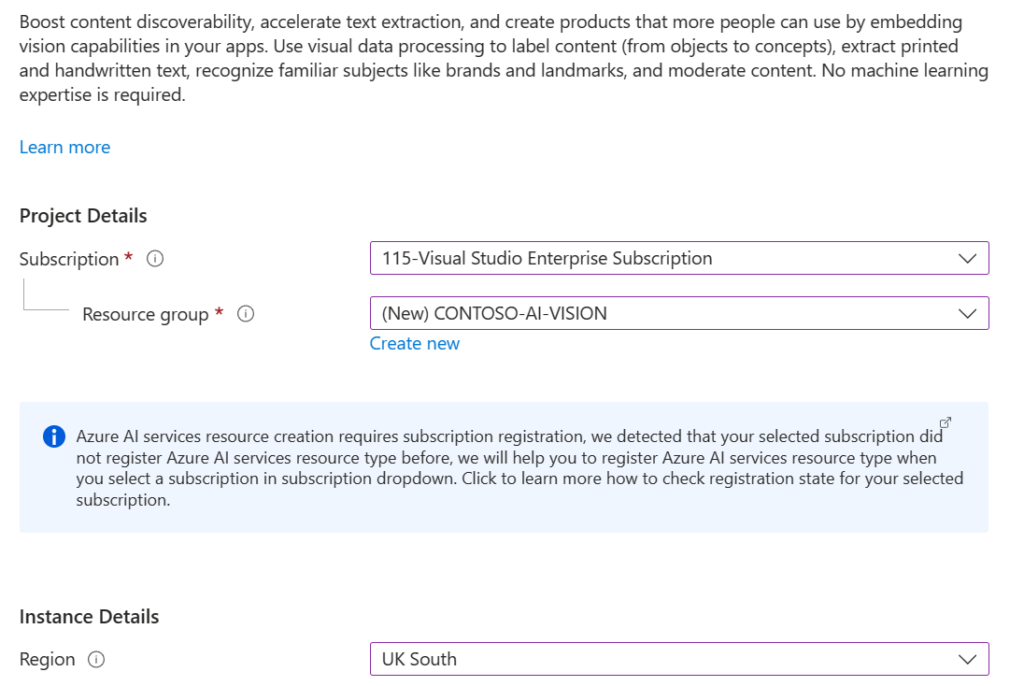
Boost content discoverability, accelerate text extraction, and create products that more people can use by embedding vision capabilities in your apps. Use visual data processing to label content (from objects to concepts), extract printed and handwritten text, recognize familiar subjects like brands and landmarks, and moderate content. No machine learning expertise is required.
If like me, you already have an Azure subscription. You’re good to go. Else, you’ll need to create one. Worry not, it’s free for 12 months. Start here.
Azure Configuration for Automatic AI Generated Alt Text
First, navigate to portal.azure.com
Then, click “Create a resource”
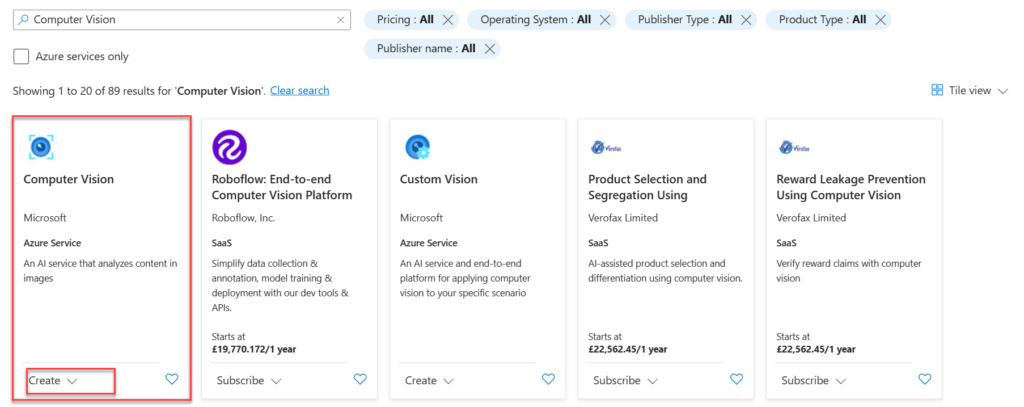
Next, search for “Computer Vision”
Click “Create” and select “Computer Vision”
Select your Subscription and Resource group (or create a new one if you choose to do so)
Lastly, make sure you select the correct Azure processing region.
Now, the important bit… the name you choose will form the Endpoint URL. These must be unique across the entirety of Azure. I’d recommend using something like. “aivision-contoso”, where Contoso is your site name. We’ll see shortly what the outcome of this will be.
Next, we move on to another important bit… pricing! Per region, you can choose one free instance (available for 12 months)
More information can be found at the Azure AI Vision Pricing page.
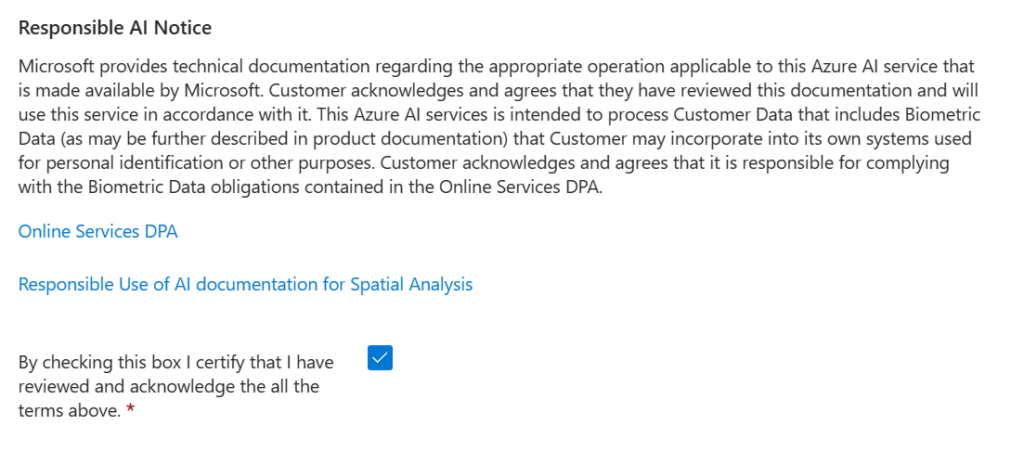
Review and acknowledge Microsoft’s Responsible AI Notice… also very important.
Click “Review and create”, and finalise the deployment.
Once complete, click “Go to resource”.
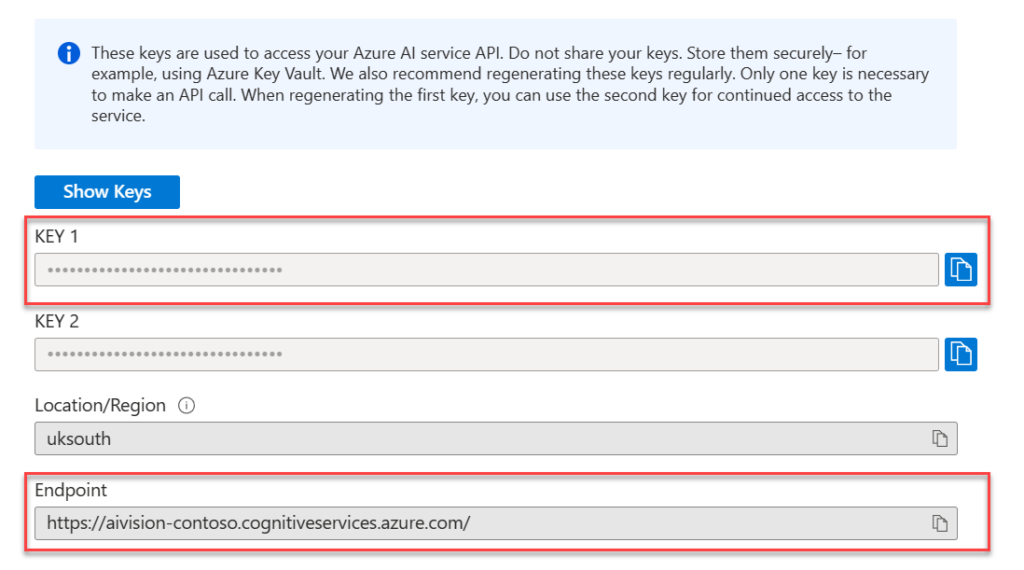
Here we’ll find our key and endpoint URL accordingly.
Note the URL is [resource-name].cognitiveservices.azure.com
WordPress Configuration
Moving back over to WordPress, we can now add our Endpoint URL and API key respectively and Save Changes.
Huzzah! Success! Finally, we’ve done it! Automatic AI generated Alt Text!
Evidenty, you may want to play around with the confidence threshold… It is AI after all, always learning.
]]>Do more with less with Teams SIP Gateway2023-09-08T19:41:17+00:002023-09-08T19:41:17+00:00https://www.watts365.com/2023/09/do-more-with-less-with-teams-sip-gatewayWhat is Teams SIP Gateway?
Teams SIP Gateway is Microsoft’s BYOD (that’s Bring Your Old Device… not Bring your own beer) offering. Consequently, enabling you to do more with less by repurposing some of your devices from your old phone system. For example, Skype for Business IP phones, Cisco IP phones with multiplatform firmware, Avaya phones (coming soon). As well as IP phones by vendors like Poly, Yealink and AudioCodes.
Teams SIP gateway also supports DECT offerings from Spectralink, Poly, Yealink and Gigaset.
Do you have analogue devices? Because, if you’re looking for something more retro for an analogue device. Teams SIP Gateway Analogue is also in Public Preview. Check out this blog without delay.
This post will review the pre-requisites and help you to get started with SIP Gateway straightaway.
Requirements
SIP Gateway is available in Worldwide and government community cloud (GCC) tenants. However, it is not yet available for GCC High or DOD
In order to use SIP Gateway, you must have the following licences:
Microsoft Teams
Skype for Business Online (Plan 2) - This isn’t a standalone license that can be purchased.
Microsoft Phone System
PSTN Connectivity
E.g. Business/Ex/Fx licences + Phone System (not required for E5), Shared Device
Teams users must have a phone number with PSTN calling enabled to use SIP Gateway.
Devices
Here’s an insight of what devices are compatible today:
SIP Device Type
Vendor and Model (* Public Preview)
IP Desk Phones
AudioCodes: 405/400HD series Cisco: 6821 and 7800/8800 series Poly: VVX 100/200/300/400/500/600 series Yealink: T20/T30/T40/T50 series Avaya: J129/J139/J159/J169/J179/J189 series*
IP Conference Phones
AudioCodes: RX50 Poly: Trio 8500/8800
IP DECT Phones, Base Stations
Ascom: d43/d63/d83/Myco3 series handsets, IP-DECT Access Points IPBsx, Gateway IPBL, Virtual Appliance IPVM Gigaset: N610/N670/N870/ N870E base stations Poly: 20/30/40 Rove series handsets, B1/B2/B4 base stations Spectralink: 72xx/75xx/76xx/77xx/PP8 series handsets, IP-DECT 200/400/6500/Virtual IP-DECT Yealink: W56H,W73H,W59R series handsets, W70B/W80/W90 base stations
Overhead Paging, Alerters and Speakers
Algo:IP Speakers: 8180G2/8186/8188/8189/8190/8190S/ 8196* IP Intercom: 8028G2/8201/8063* IP Visual Alerters: 8128G2/8138* IP Paging Adapters: 8301/8373* IP Display Speakers: 8410/8420*
A full list of compatible devices can be found here. Note this may change as more devices are added or removed from compatibility.
Configuring Teams SIP Gateway
Before you can configure SIP Gateway, do the following:
Firstly, reset SIP devices to factory default settings. You or your organisation’s users must reset each SIP device used with SIP Gateway to its factory default settings. To find out how to do that, see the manufacturer’s instructions.
Then ensure to open your firewall to Microsoft 365 and Teams. Open your network’s firewall to Microsoft 365 and Teams traffic as described in Office 365 URLs and IP address ranges. Firewall rules are needed for outbound traffic only.
Make sure the SIP devices are not behind a proxy. Ensure that http/s traffic bypasses any corporate http/s proxy.
Open the UDP port. Open UDP port in the range 49152 to 53247 for IP ranges 52.112.0.0/14 and 52.122.0.0/15.
Open the TCP port. Open TCP port 5061 for IP ranges 52.112.0.0/14 and 52.122.0.0/15.
Open the following IP addresses for HTTP and HTTPS:
13.75.175.145
52.189.219.201
51.124.34.164
13.74.250.91
13.83.55.36
23.96.103.40
Next, you’ll need to enable SIP Gateway for user’s in your organisation.
To enable SIP Gateway in the Teams admin center, follow these steps:
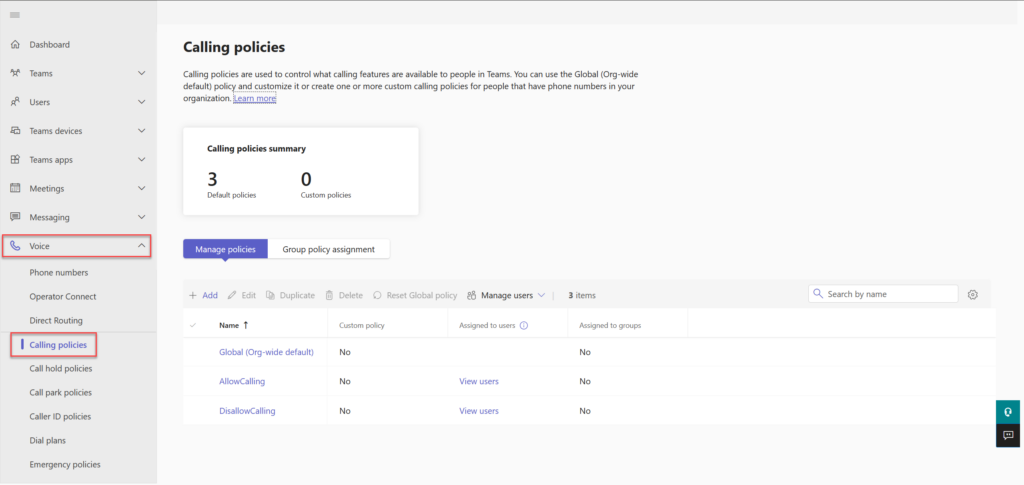
At the left, under Voice, select Calling policies.
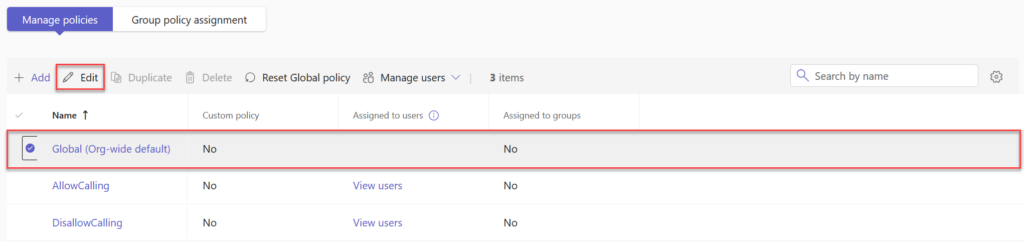
At the right under Manage policies, select the appropriate calling policy assigned to users or, if necessary, create a new calling policy and assign it to the required users.
Select Manage policies, select a policy, and then select Edit.
Turn on the setting for SIP devices can be used for calls, and then select Save.
Note: Policy propagation may take up to 24 hours.
Set the SIP Gateway provisioning server URL
You can set the SIP Gateway provisioning server’s URL in your Dynamic Host Configuration Protocol (DHCP) server. Users who work remotely must configure it manually.
Using DHCP
For each SIP device, set one of the following SIP Gateway provisioning server URLs:
EMEA: http://emea.ipp.sdg.teams.microsoft.com
Americas: http://noam.ipp.sdg.teams.microsoft.com
APAC: http://apac.ipp.sdg.teams.microsoft.com
Add SIP devices to your Teams organization by configuring the above SIP Gateway provisioning server URL in your DHCP server. To learn more about DHCP server, see Deploy and manage DHCP. Also, you can use DHCP option 42 to specify the Network Time Protocol (NTP) server, and DHCP option 2 to specify the offset from Coordinated Universal Time (UTC) in seconds. The devices in your organization will be routed to the SIP Gateway provisioning server. Successfully provisioned SIP phones will display the Teams logo and a soft button for sign-in.
Ensure SIP devices are on the minimum supported firmware version for onboarding. During onboarding, SIP Gateway will push the default configuration and authentication user interface to the device. To find out the required firmware version for SIP devices, see Plan for SIP Gateway.
Manually
Users who work remotely must manually configure the provisioning server URL into their SIP device by using the following steps:
Open Settings on the device and get the device’s IP address.
Open a browser window, enter the device’s IP address, log in (if necessary) and configure the provisioning server’s URL in the device’s web utility.
Under Settings or Advanced settings on the web utility, enter the provisioning server URL shown above.
Configure conditional access
Conditional Access is an Azure Active Directory (Azure AD) feature that helps ensure that devices that access your Microsoft 365 resources are properly managed and secure. SIP devices are not managed by Intune hence conditional access checks applied to them are stricter than those applied to users. SIP Gateway authenticates SIP devices with Azure AD, so if your organization uses Conditional Access for devices in the corporate network, it should exclude the following SIP Gateway service IP addresses:
North America:
East US: 52.170.38.140
West US: 40.112.144.212
EMEA region:
North EU: 40.112.71.149
West EU: 40.113.112.67
APAC region:
Australia East: 20.92.120.71
Australia Southeast: 13.73.115.90
Provisioning and Signing In
Provisioning
To streamline your tasks, you can enroll SIP devices in the Teams admin center either one at a time or in batches. Here’s how:
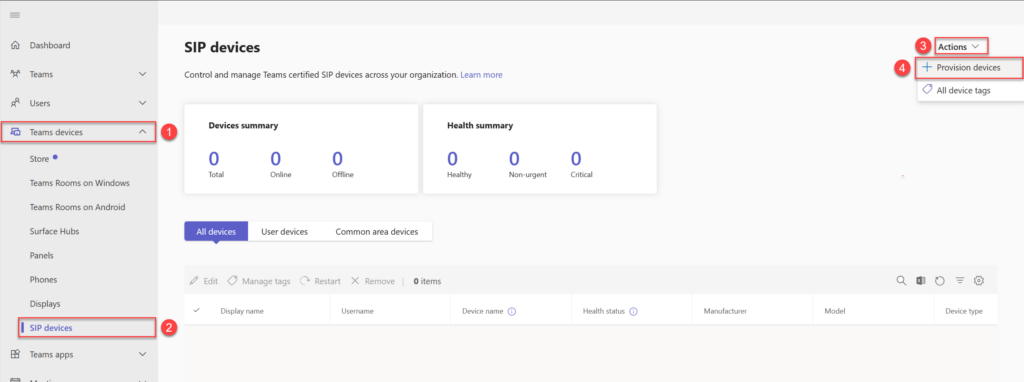
At the upper right, select Actions > Provision devices and follow one of these steps:
To provision one device:
a. Under Waiting on activation, select Add.
b. On the Add MAC addresses pane, enter the MAC address and Location of the device, and then select Apply.
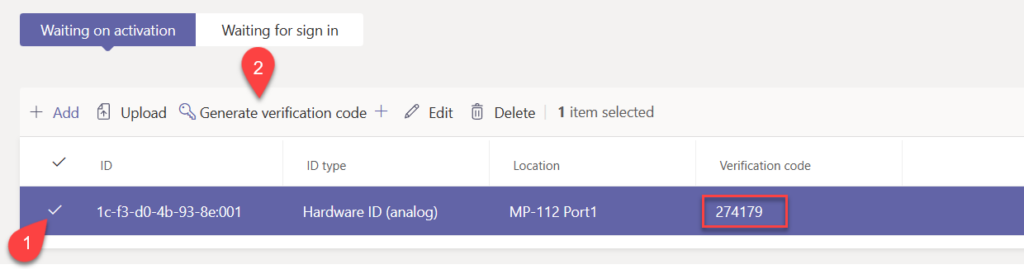
c. Under Waiting on activation, select the device you just added, and then select Generate verification code.
d. Then, on the Provision devices pane, under Verification code, note the verification code for the SIP device.
User Sign In
To pair a SIP device after the user authenticates using corporate credentials, a user must:
Press Sign-in on the SIP phone to display the authentication URL and pairing code. The pairing code is time-sensitive. If it expires, the user must press Back on the phone and start the sign-in process again.
Navigate to the authentication URL on the user’s desktop or mobile browser and use corporate credentials to log in.
Enter the pairing code displayed on the SIP phone into the web authentication app to pair the SIP phone with the user’s account. On a successful sign-in, which might take a while, the SIP phone will display the phone number and username, if the device supports it.
Common Area Phone Sign In
To provision many devices:
a. Under Waiting on activation, at the right, select Export (the Microsoft Excel icon).
b. On the Provision devices pane, under Upload multiple MAC addresses, select download a template.
c. Save Template_Provisioning.csv to your computer and fill in the MAC id and Location fields.
d. On the Provision devices pane, select Upload multiple MAC addresses.
e. At the right on the Upload MAC addresses pane, select Select a file, and select the Template_Provisioning.csv file that contains your data.
f. On the Provision devices pane, under Waiting on activation, select a device and then select Generate verification code to generate a one-time verification code for each provisioned device. Note the verification code for each SIP device.
On the SIP device, dial the enrollment feature code followed by the verification code. On the SIP device, dial the enrollment feature code *55* (used by SIP Gateway for enrollment one-time-verification code validation), followed by the verification code that is generated in Teams Admin Center for this particular device. For example, if the verification code is 123456, dial *55*123456 to enroll the device.
Afterwards, on the Provision devices pane, under Waiting for sign in, select Signed out.
When in the Sign in a user dialog, the authentication URL and pairing code will be displayed.
Then, navigate to the authentication URL on the user’s desktop or mobile browser and use corporate credentials to log in.
Finally, enter the pairing code displayed in the Sign in a user dialog into the web authentication app to pair the SIP phone with the user’s account. On a successful sign-in, which might take a while, the SIP phone will display the phone number and username, if the device supports it.
Further information can be found at [Configure SIP Gateway - Microsoft Teams
Microsoft Learn](https://learn.microsoft.com/en-us/microsoftteams/sip-gateway-configure)
]]>Configuring SIP Gateway - Analogue2022-11-01T15:45:57+00:002022-11-01T15:45:57+00:00https://www.watts365.com/2022/11/configuring-sip-gateway-analogueDust off your analogue phones and connect them to Microsoft Teams! Through the power of Microsoft’s SIP Gateway, you can now connect your compatible Analogue Telephone Adapters (ATA) and devices to Microsoft Teams. Configure SIP Gateway Analogue today!
Beginning in early 2023, SIP Gateway will support analogue telephones, allowing you to use Teams calling functionality on the following compatible analogue telephone adaptor (ATA) models from AudioCodes, Cisco, and Poly.
Some use cases for SIP Gateway Analogue may include, but are not limited:
Lift Phones
Hot Line Phones (Inbound only)
Taxi Freephone handsets
Door Access Control Phones
These use cases bring features like Automatic Dialling, which your ATA may already support into the Microsoft Teams Phone ecosystem. (I’ve been testing with an AudioCodes MP-112 FXS)
In order to use SIP Gateway Analogue, you must first enable and configure SIP Gateway in your Teams environment. If you haven’t already enabled this, check out Plan SIP Gateway and Configure SIP Gateway before you continue.
It’s important to call out that Analogue devices are only supported for Common Area Phone (CAP) accounts.
I’m using an AudioCodes MP-112 FXS for this guide, the configuration steps may differ depending on the device.
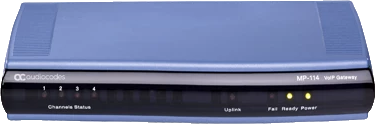
AudioCodes MP-114 FXS
Device Firmware
The supported firmware level for this device is 6.60A.367.001.
MP-11x FXS/FXO - Download firmware here
MP-124 FXS - Download firmware here
To install the firmware:
Login to the web interface of the device.
Open the Software Upgrade wizard, by performing one of the following:
a. Select the Maintenance tab, click the Software Update menu, and then click Software Upgrade Wizard.
b. On the toolbar, click Device Actions, and then choose Software Upgrade Wizard:
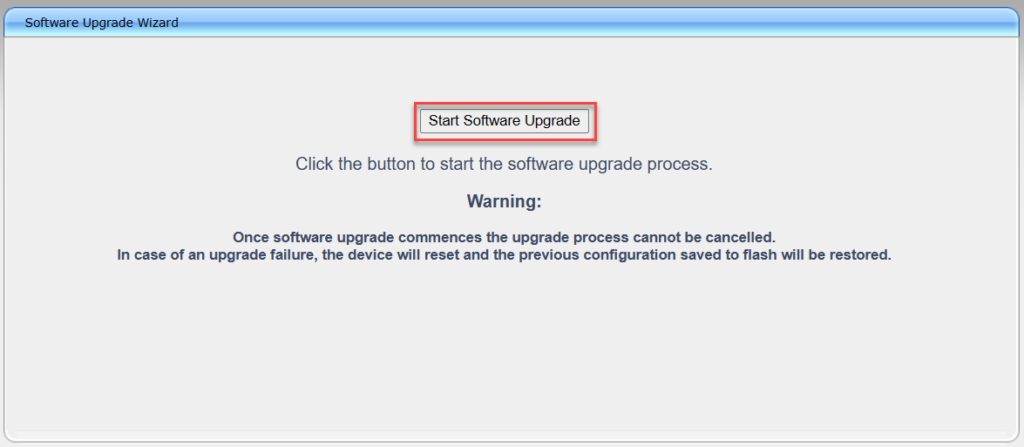
Click the Start Software Upgrade button; the wizard starts, requesting you to browse to a .cmp file for uploading.
Click the Browse button, navigate to the .cmp file, and then click Load File; a progress bar appears displaying the status of the loading process.
Click the Reset button to reset the device with the newly loaded .cmp file.
After the device resets, the End of Process wizard page appears displaying the new .cmp file loaded to the device. Verify this by viewing the firmware version.
Setting the IP Address
The MediaPack series support static IP addressing, therefore a proper working static IP address/netmask/gateway/DNS are needed to be setup for the device to establish IP network connectivity prior to applying provisioning settings for SIP Gateway. AudioCodes provides some comprehensive guidance on this in their Quick Start Guide.
Configuring Provisioning Server URL
Access the Admin Page (by appending “AdminPage” to the device’s IP address in the Web browser’s URL, for example: http://10.0.0.100/AdminPage.
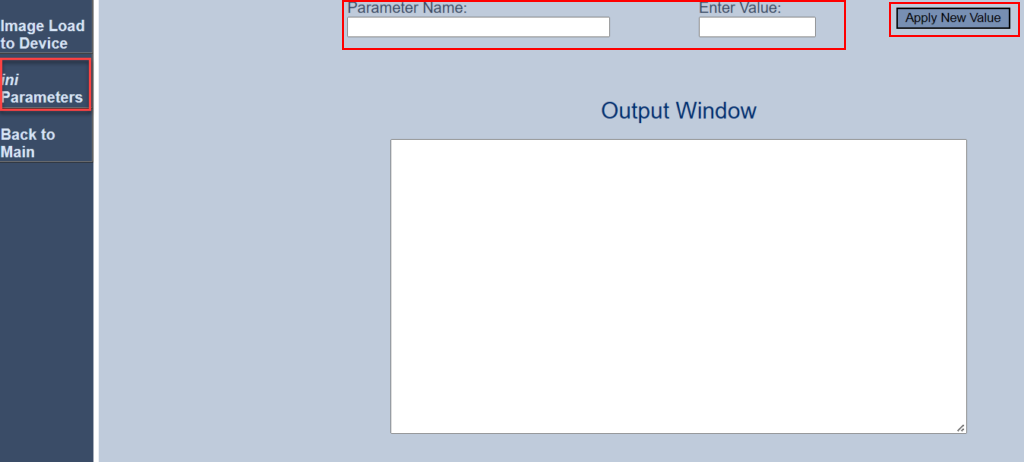
Press the ini Parameters on the left pane.
Apply the following parameters, one-by-one
Parameter Name
Enter Value
inifileurl
Please select from the list below
AUPDResetURLOnWebConfig
1
setdefaultoninifileprocess
1
The inifileurl parameter is different dependant on your region
URL MUST be appended with /mac.ini
EMEA
http://emea.ipp.sdg.teams.microsoft.com/mac.ini
Americas
http://noam.ipp.sdg.teams.microsoft.com/mac.ini
APAC
http://apac.ipp.sdg.teams.microsoft.com/mac.ini
Analog Gateway obtains the onboarding configuration and reboots.
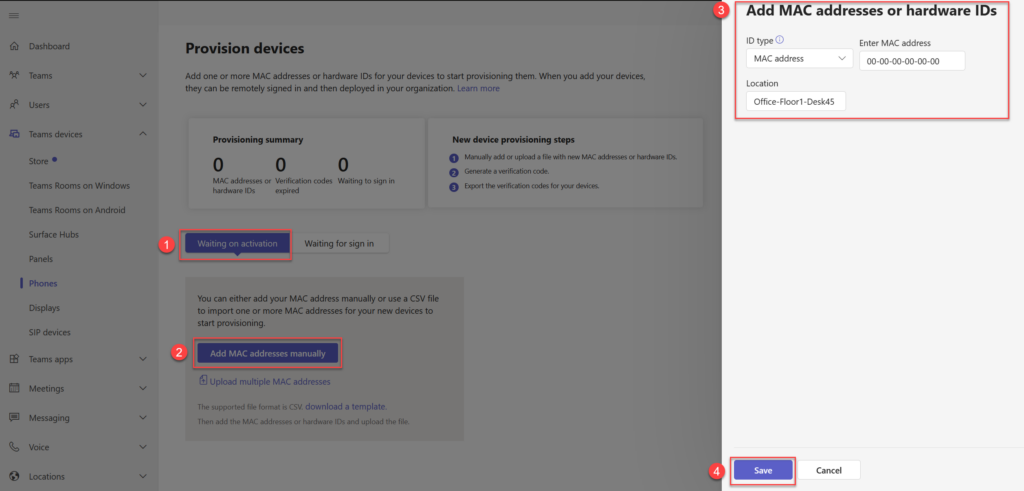
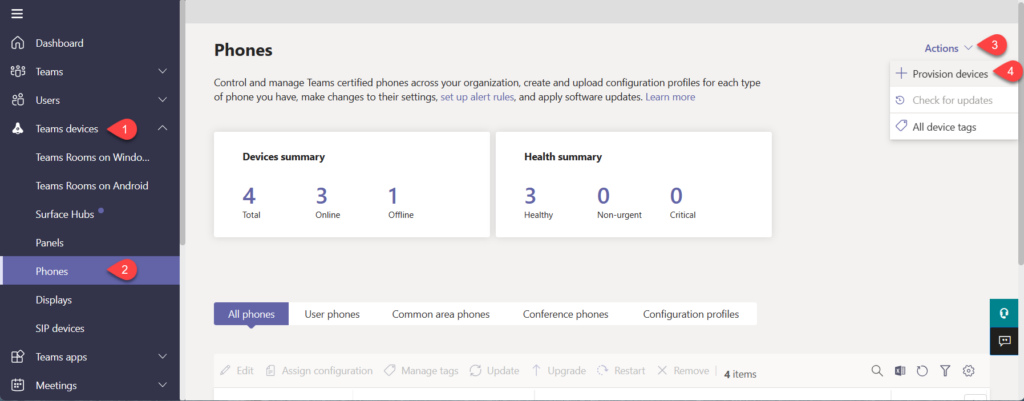
Select Teams devices→ Phones→ Actions→ Provision devices
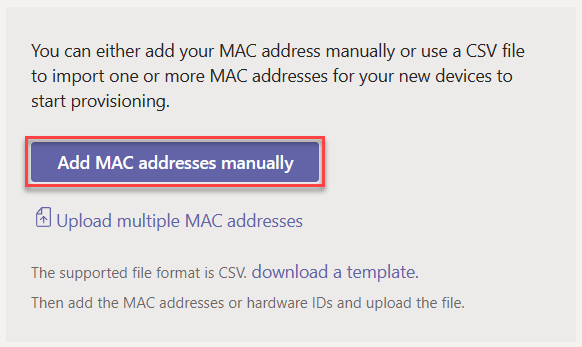
Click the Add MAC addresses manually button
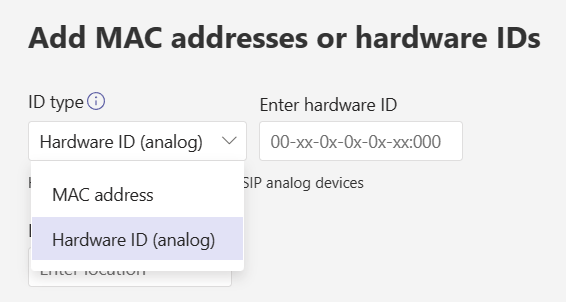
Change the ID type to “Hardware ID (analog)”
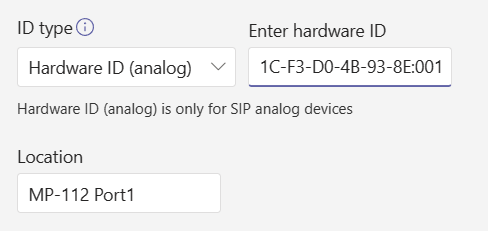
Enter your hardware ID in the format of macaddress:port (e.g. 01:02:03:04:05:06:001)
Enter a location, if you wish to do so. (Entering a location, or any other identifier here will help identity the device when you sign the device in. I’ve used MP-112 Port 1, to reference FXS port 1)
Click “Save”
On the “Waiting for activation” page, select your device, click “Generate verification code”. You’ll see a verification code is now visible.
Remote Sign In
Plug an analogue phone into the FXS port on the MP-112, off hook and dial *55*[Verification Code] E.g. *55*274179
You’ll hear a confirmation tone, place the phone back down.
In the Teams Admin Center, switch to the “Waiting for Sign in” tab, select the hardware ID (analogue) and press “Sign in a user”
Follow the instructions to Sign the user in.
Go to https://microsoft.com/devicelogin
Copy and paste the code
Sign in with the user credentials
Return to the Teams Admin Center.
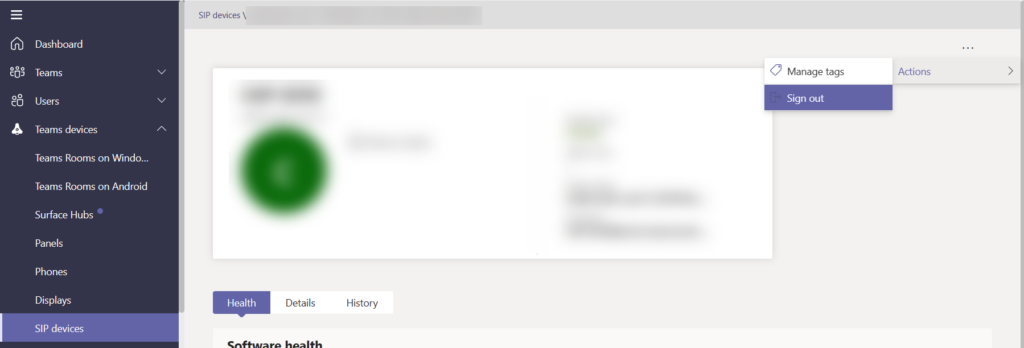
You’ll now see the device and user details under Teams Devices → SIP devices
Click on three dots (…) in the upper right part of the web page→ Actions→ Sign Out
Other Useful Documents
AudioCodes MP-11x - Onboarding AudioCodes ATAs to Microsoft SIP Gateway
Cisco ATA 19x - Onboarding Cisco ATA 19x with Microsoft SIP Gateway
Poly OBi - Onboarding Poly OBi with Microsoft SIP Gateway
]]>Routing calls to unassigned numbers - Public Preview2021-10-25T13:51:02+00:002021-10-25T13:51:02+00:00https://www.watts365.com/2021/10/routing-calls-to-unassigned-numbers-public-previewUnassigned numbers can potentially have a negative impact on an organisation’s reputation.
For example, when an employee leaves the organisation, their phone number is re-added to the pool of available numbers.
If a customer calls that number there is generally no way for them to know that the person has left the organisation or how they can reach someone else with regards to their query.
This could mean the loss of business. In Skype for Business server you have the ability to route unassigned numbers to an announcement, response group or user. This functionality is now available for Microsoft Teams in Public Preview.
Let’s take a look at how we set up unassigned number routing in Microsoft Teams.
Pre-requisites
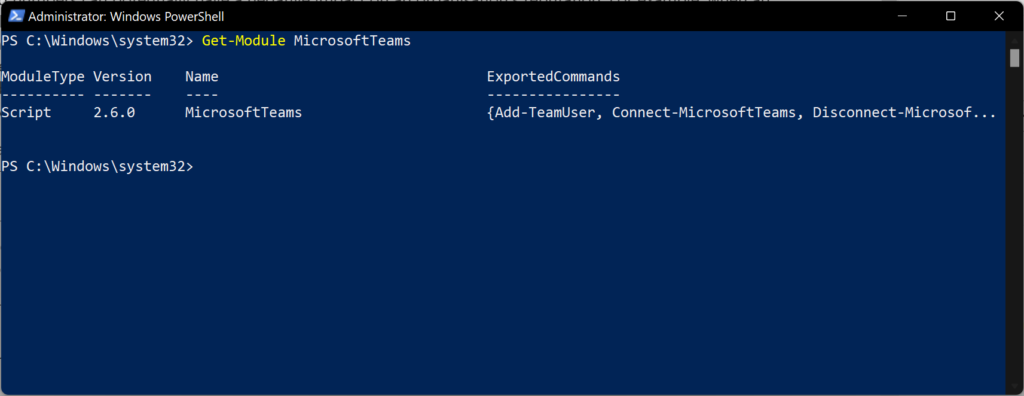
Before I can set up unassigned number routing, I need to update the Microsoft Teams PowerShell module to version 2.5.1 or later. I do this by running the following command.
Update-Module MicrosoftTeams
I can confirm the update was successful, by running the two commands.
When configuring unassigned number routing, there are two options in Microsoft Teams, these are:
Send the call to a Call Queue or Auto Attendant
Play an announcement to the caller
Let’s look at how to configure these based on common business scenarios.
Sending Unassigned numbers to a Call Queue or Auto Attendant
Sending unassigned numbers to a call queue or auto attendant is a great way to ensure the caller gets through to someone when a number is no longer in use.
An example of this may be a sales team, if a sales agent leaves the organisation, we would want to ensure their call gets through to someone in the sales team to avoid losing their business.
Contoso has a reserved range of phone numbers for their Sales team.
The reserved range is between +441632 900 901 and +441632 900 909.
The resource account configured for their Sales Call Queue is ‘sales@cloud.teamcontoso.com’
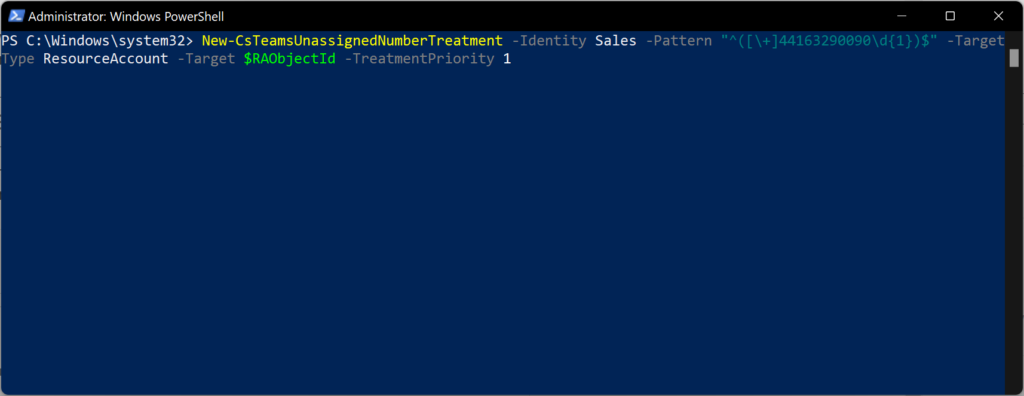
In this scenario, I will set all unassigned numbers between +441632 900 901 and +441632 900 909 to route to the Sales Call Queue (sales@cloud.teamcontoso.com).
Note:All numbers used in this example are fictional and allocated by Ofcom for TV and Radio use only.
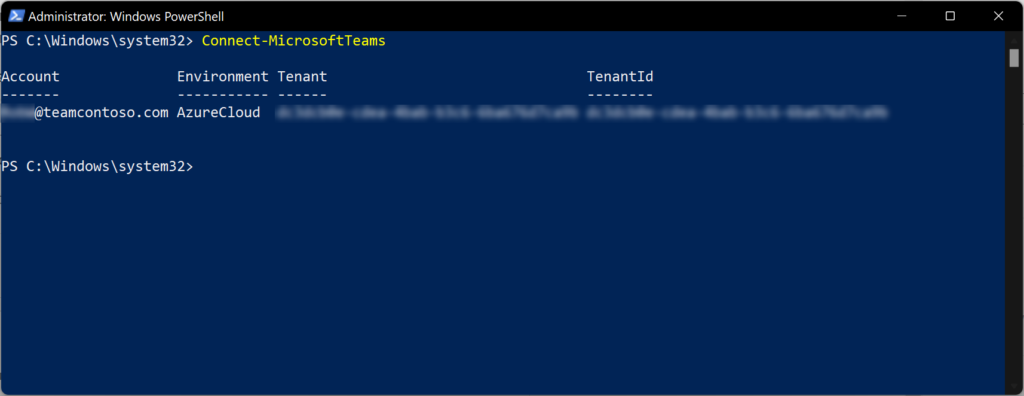
The first thing I’ll do is open PowerShell and connect to Microsoft Teams. I’ll run this command to connect to Microsoft Teams.
Connect-MicrosoftTeams
Now, I’m connected, I can look at the command to set the unassigned number routing policy.
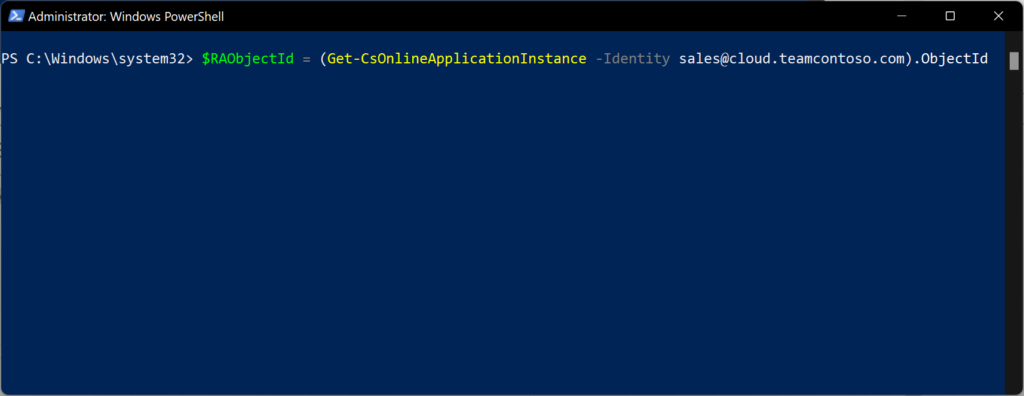
I will need to save the Resource Account’s GUID as a variable. I’ll run this command to do that.
If like me, you struggle with Regex, you could use Regex101.com to help formulate your regular expression for your phone number range.
Play an announcement to the caller
Playing an announcement is a simple but effective way to let someone know that the number they have called is not in use.
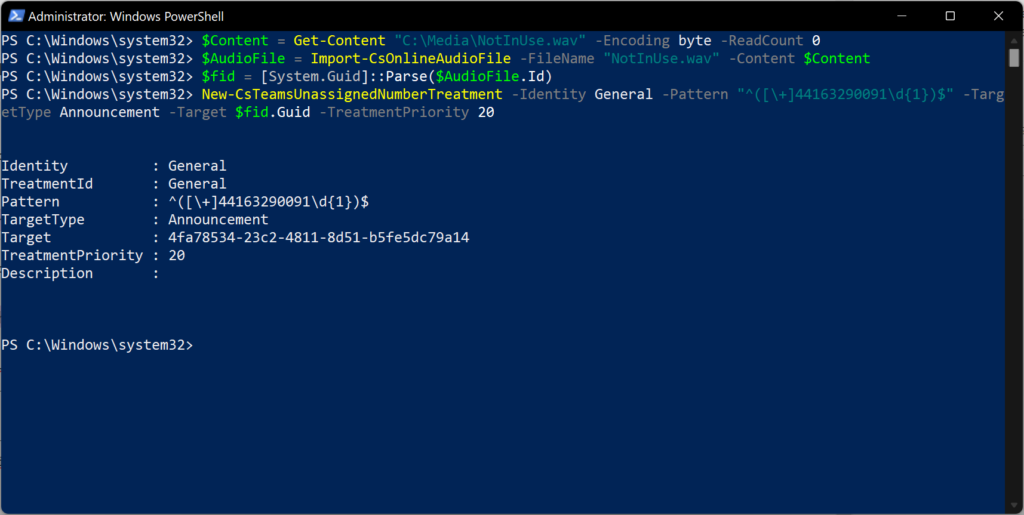
In this scenario, I will set all unassigned numbers between +441632 900 910 and +441632 900 919 to play Contoso’s announcement (NotInUse.wav) to inform the caller that the number is no longer in service.
The first thing I’ll do is define my announcement file.
If routing to an announcement, the audio file will be played once to the caller.
To route calls to unassigned Microsoft Calling Plan subscriber numbers, your tenant needs to have available Communications Credits.
To route calls to unassigned Microsoft Calling Plan service numbers, your tenant needs to have at least one Phone System – Virtual User license.
[Routing calls to unassigned numbers - Microsoft Teams
Microsoft Docs](https://docs.microsoft.com/en-us/microsoftteams/routing-calls-to-unassigned-numbers)
]]>Dig Deeper into CQD data with Power BI2021-07-24T14:34:46+00:002021-07-24T14:34:46+00:00https://www.watts365.com/2021/07/dig-deeper-into-cqd-data-with-power-bi-part-1A positive user experience is important to success of any service. For calling with Microsoft Teams, the quality of the calls is the perfect metric to measure this success. But there is a significant difference between actual call quality and the perception of poor quality. The use of Microsoft Teams’ Call Quality Dashboard (CQD) and Call Analytics can help bridge the gap between reality and perception.
Call Analytics gives you the ability to investigate a specific call where your user might have had a poor experience. Find out more about Call Analytics here.
In CQD however, you can analyse call quality trends in your organisation. This is good for providing IT leaders with statistics and numbers around the averages across the organisation. More information about CQD can be found here.
With the use of Power BI, you can dig deeper into the data from CQD, as well as get a better understand of the experience across your estate. Microsoft’s Product Engineering team have created some amazing templates to get you started.
Installing the CQD Power BI Report
Pre-requisites
Report reader role (at a minimum) - More information about access to CQD is available here.
Power BI Pro licence.
Power BI Desktop application
Installation
Download the QER Power BI templates from here. (v4.4 released 26/07/2021)
Once downloaded, extract the contents of the zip folder.
Read the QER Release notes, for all the latest updates.
Install the Microsoft Call Quality PBI Connector.
Check to see if your computer already has a [Documents]\Power BI Desktop\Custom Connectors folder. If not, create this folder now.
Download or use the supplied connector file (*.pqx file) and place it in the Custom Connectors directory created in Step 1.
Launch Power BI Desktop.
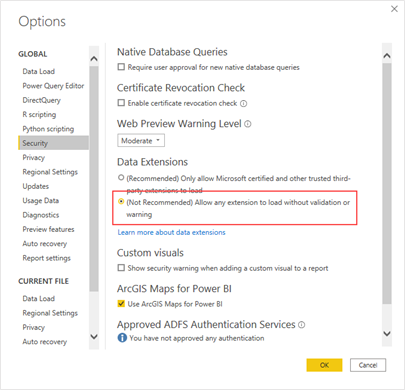
Select File > Options and settings > Options > Security
Under Data Extensions, select (Not Recommended) Allow any extension to load without validation or warning.
Select OK, and then restart Power BI Desktop.
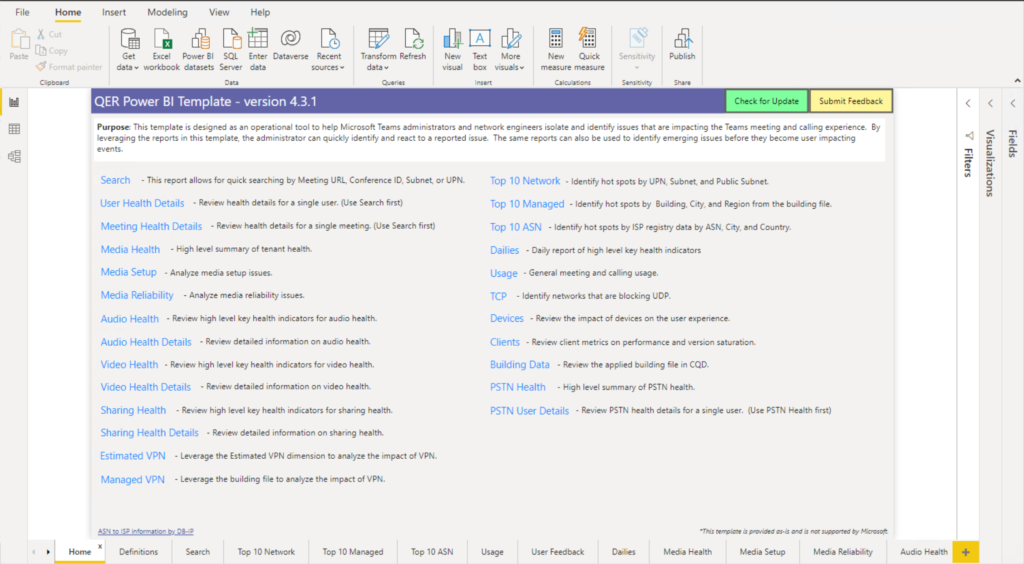
Open the QER vx.x.pbit file in Power BI Desktop.
Power BI can be slow to load for the first time, patience is key
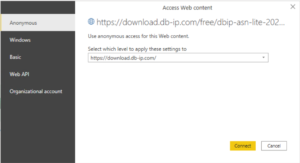
Click “Connect” to allow access to the ASN data.
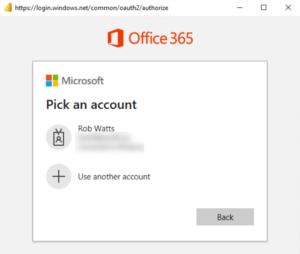
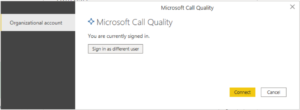
Click “Sign in” to connect to CQD data.
Click “Connect”.
The CQD data will now be loaded into the report.
Publishing the CQD report to Power BI online
By Publishing this to Power BI online, you can make the report available to others in a Workspace, you’ll also be able to view the data online without the need to use the Power BI Desktop application
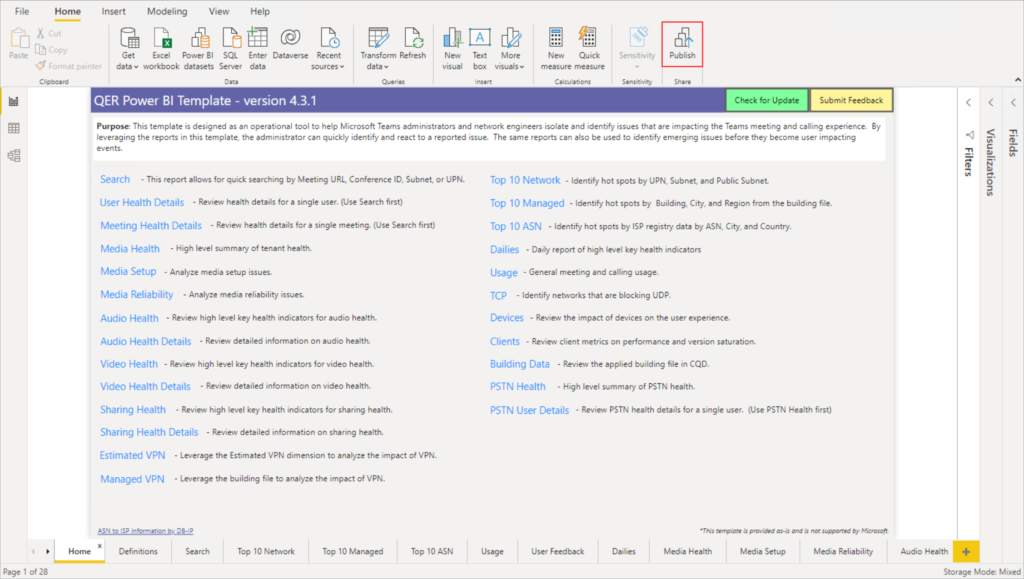
Click “Publish” on the ribbon.
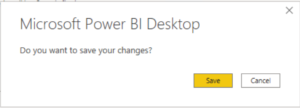
You’ll be prompted to save changes.
When you save the .pbix files, be sure to a friendly name, as this is will be the name of the report in Power BI Online.
Now the report has been published to Power BI online, we can refresh the data.
I’d recommend creating a scheduled refresh, this will keep the data up to date.
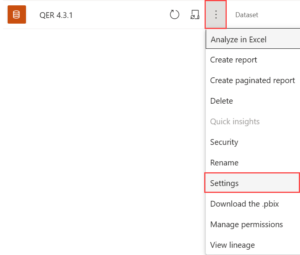
Navigate to the Dataset Settings
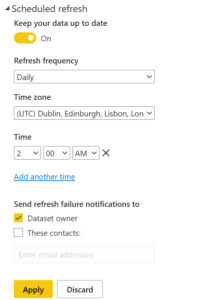
Turn on “Keep your data up to date”
Select your Request frequency and times.
Click “Apply”
You’ve just installed and published the Microsoft Teams CQD QER templates. Take some time to explore the pages in the report!
I’ll be back with another article all about the pages and what to look out for.
Watch this space!
]]>Microsoft Build 2021 - New developer features for Microsoft Teams2021-06-06T18:24:35+00:002021-06-06T18:24:35+00:00https://www.watts365.com/2021/06/microsoft-build-2021-new-developer-featuresAt the end of May, Microsoft hosted Build 2021, an annual conference aimed at the Microsoft 365, Azure, software, and web developer community. Back in January this year, Microsoft CEO, Satya Nadella outlined his vision for turning Teams into a “digital platform as significant as the internet browser”. Now with 145 million daily active users and the recent release of Teams for personal use, it is well on its way to becoming this, if not already.
Here’s a re-cap of some of the developer features announced at Microsoft Build 2021.
Shared stage integration available in preview
You can now build apps that enable real-time, multi-user collaboration experiences by extending the “main stage” of a Teams meeting. This will enable users to add an app and share it with other attendees to provide in-the-moment collaboration – such as scenarios involving whiteboarding, design, project boards, and more. Check out the docs to learn how to get started.
Together Mode extensibility
You will soon be able to easily create your own custom scenes for Teams meetings and share them with others. Using a scene designer tool in the Developer Portal, you can craft custom scenes and configure where users show up – making meetings more fun, inclusive, and engaging. Learn how to start building scenes today.
This really enables organisations to get the most out of Teams and even make it more their own. I can’t wait to build my own custom scenes.
Azure Communication Services with Teams interoperability
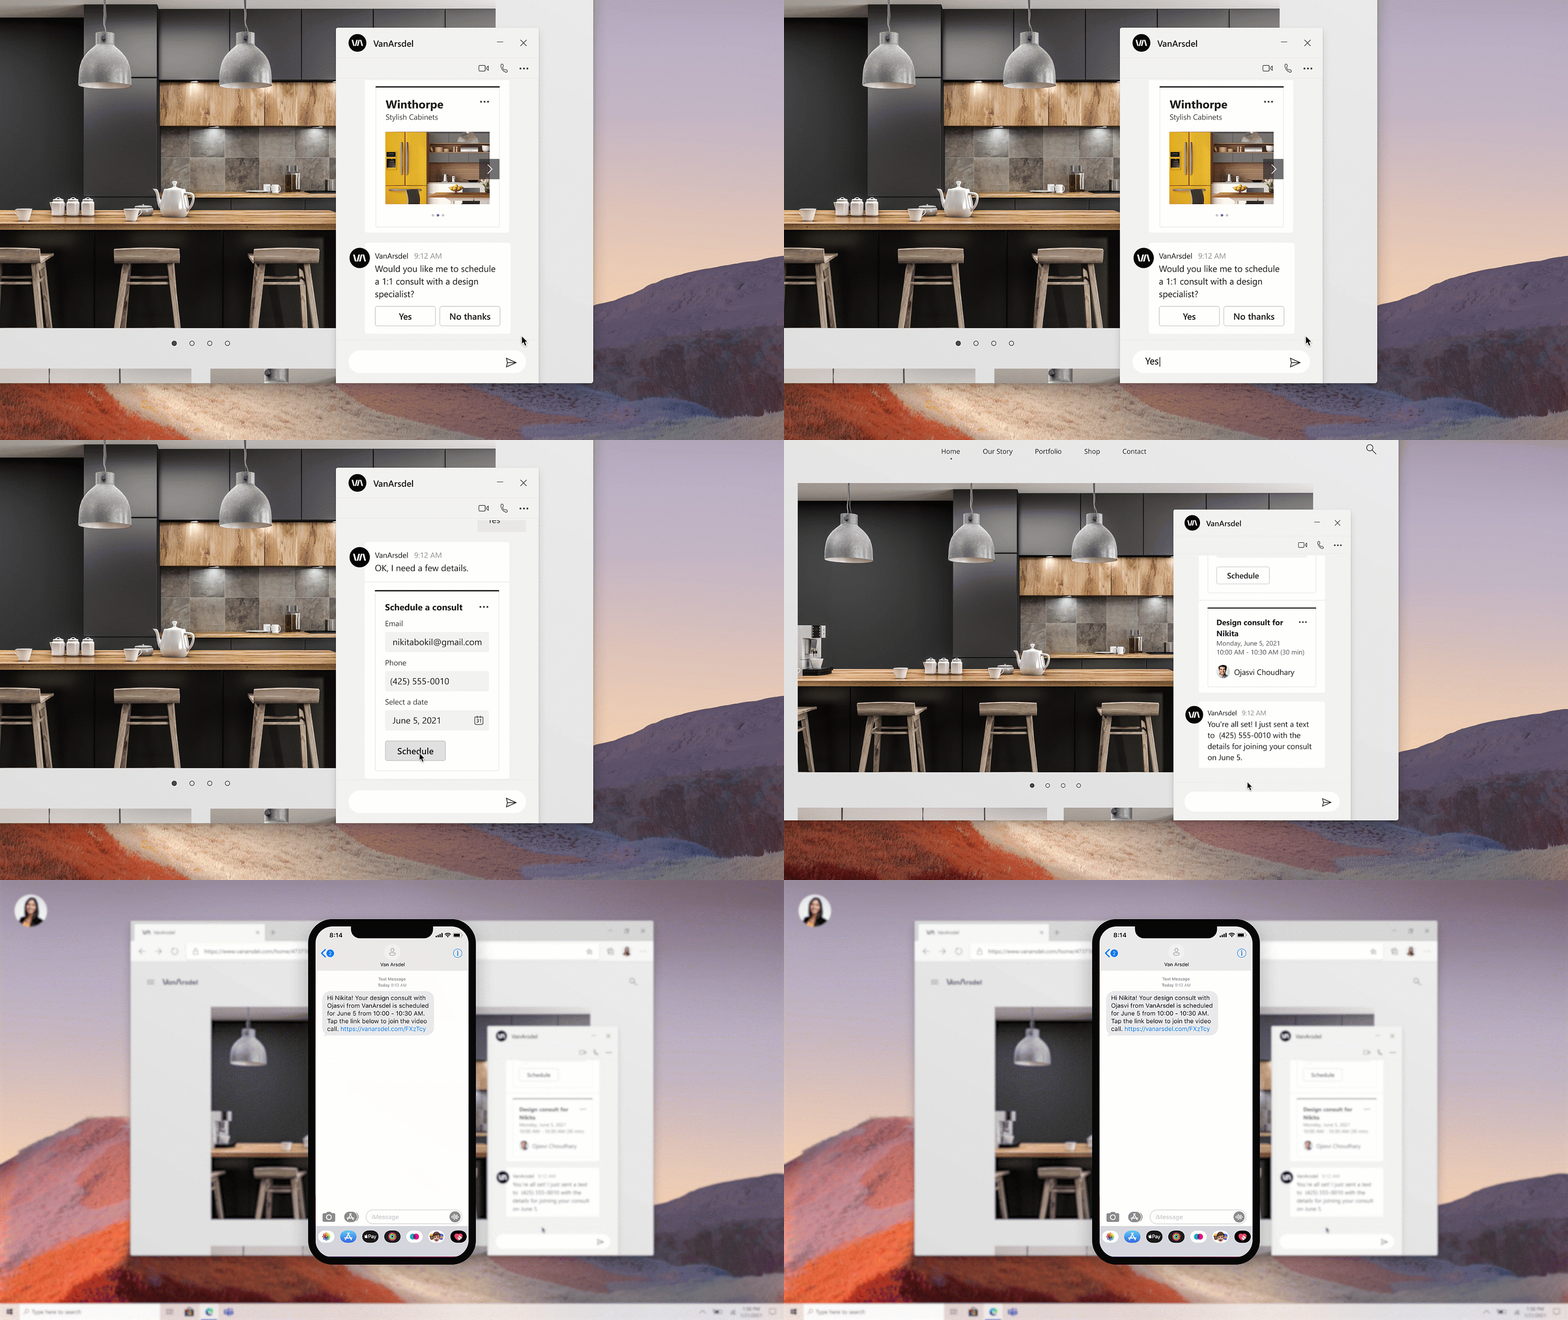
At Ignite, Microsoft unveiled the preview of Azure Communication Services with Teams interoperability – enabling you with rich communication APIs, SDKs, and UI frameworks to build branded communication experiences and apps that work outside of Teams but also provide interoperability within Teams, as well.
This is something which I’ve started looking at already and already have an idea on how it could be put to good use. Watch this space.
Microsoft Teams Toolkit for Visual Studio & Visual Studio Code
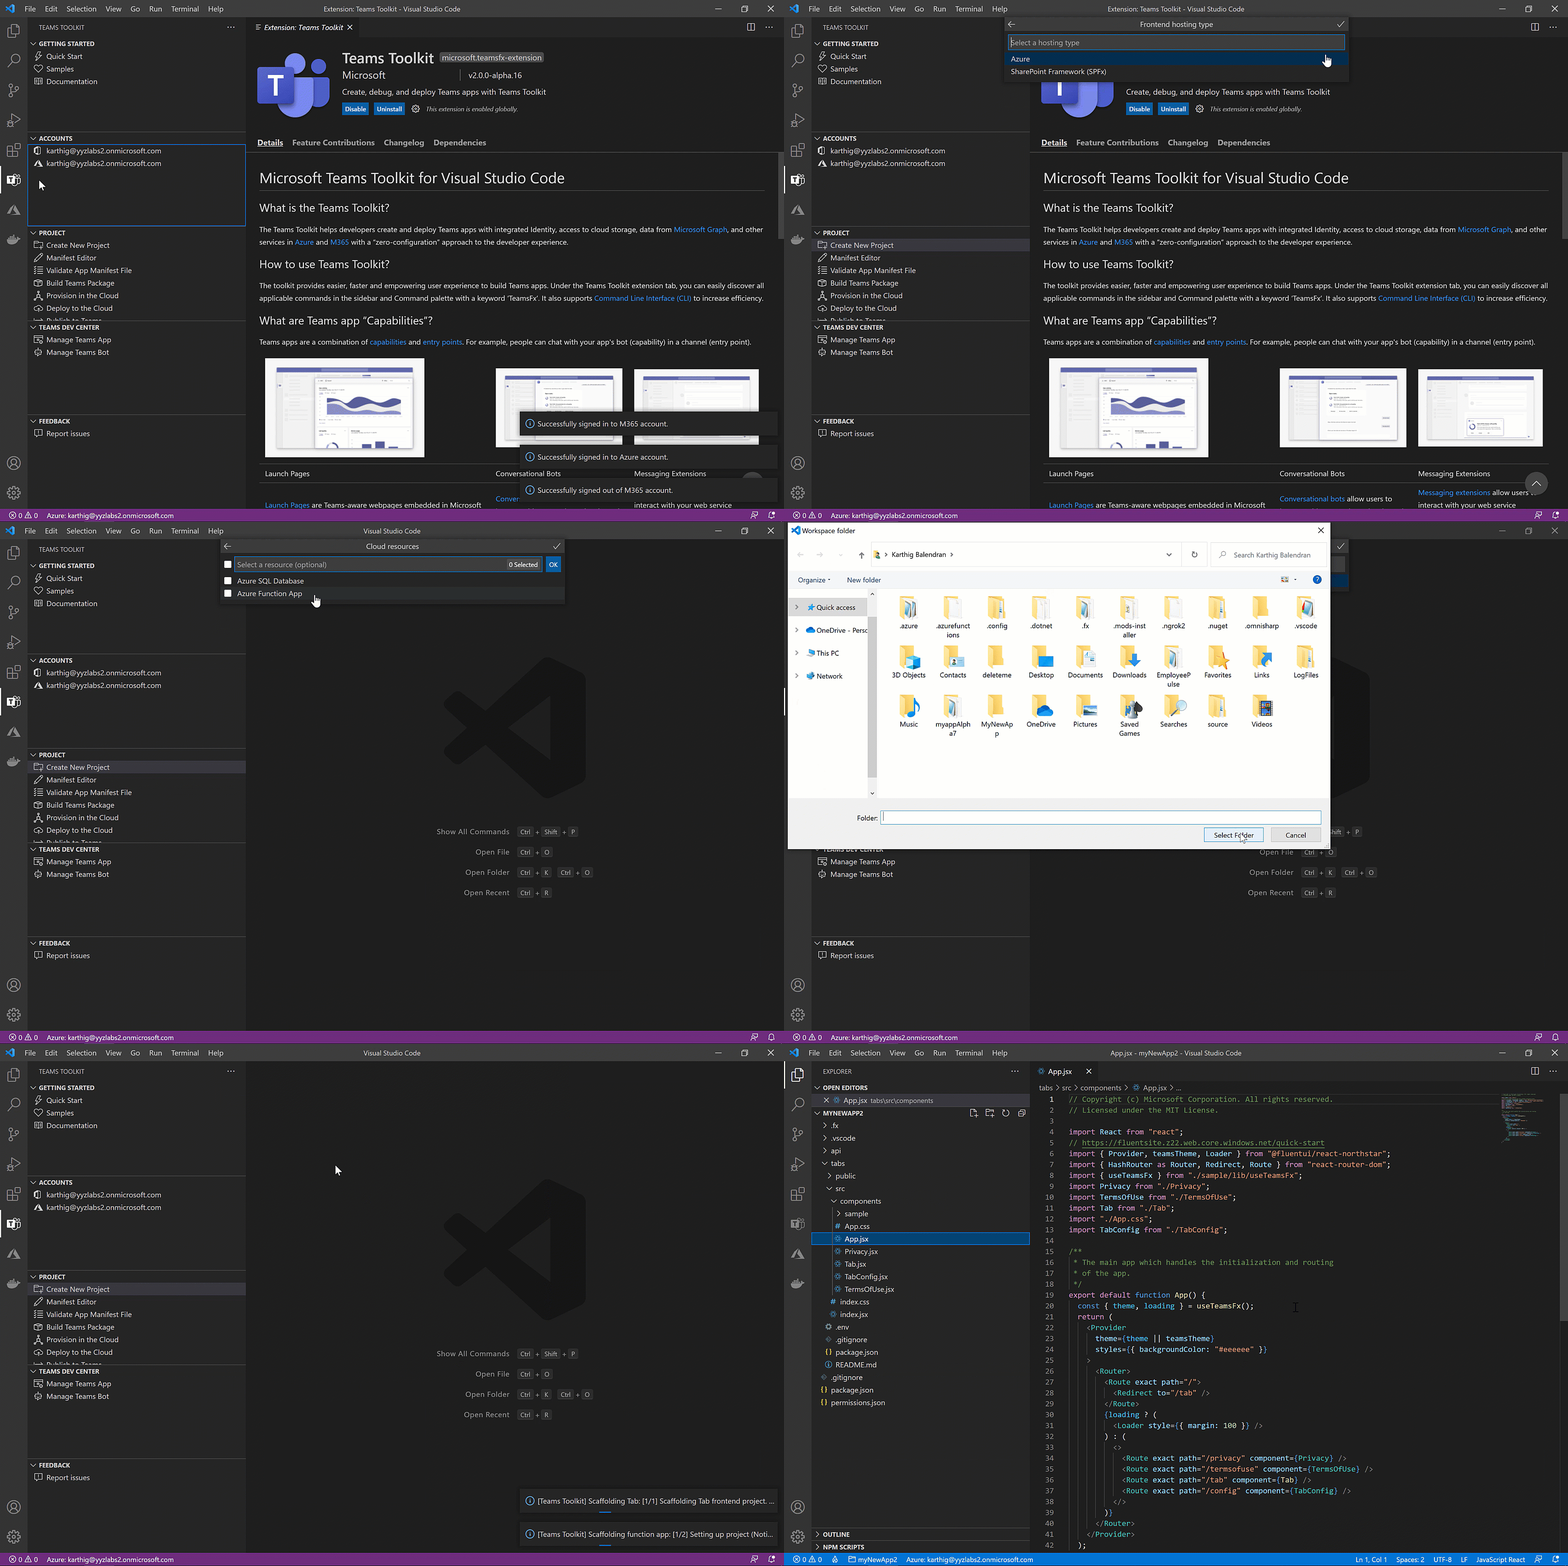
The enhanced Teams toolkit for Visual Studio & Visual Studio Code simplifies building Teams desktop and mobile apps by providing more out-of-the-box integrations across the Microsoft stack. Notable new features include Azure Functions integration, single-line Microsoft Graph Client, SPFx integration and streamlined hosting to an integrated development environment (IDE). Install the Teams Toolkit today.
As I start to become a developer myself, this will become very useful indeed.
Microsoft Teams Developer Portal
The Developer Portal provides you a dedicated app management console available via web or within Teams, which you can use to register and configure your apps within a single, central location. Key features include the ability manage environment configurations, collaboration with peers, app usage insights (preview), and more! Get started with Developer Portal today.
This is big news for any developer. I’ll report back once I’ve had a play myself.
These are my top 5 announcements! There are plenty more. Check out the blog post here: [Microsoft Teams announces new developer features
Build 2021 - Microsoft Tech Community](https://techcommunity.microsoft.com/t5/microsoft-teams-blog/microsoft-teams-announces-new-developer-features-build-2021/ba-p/2352558)